Python 运维脚本,零基础入门到精通,收藏这篇就够了
*工具实战:**集中训练抓包工具(Wireshark)、渗透测试工具(Nmap)、漏洞扫描工具(Nessus 基础版)的使用,结合模拟场景练习工具应用(掌握基础扫描逻辑,为 SRC 漏扫工具进阶做准备)。实战技能训练:开展漏洞扫描、漏洞利用、电商系统渗透测试、内网渗透、权限提升(Windows、Linux)、代码审计等实战训练,结合运维中熟悉的系统环境设计测试场景(强化红蓝对抗攻击端技术能力)。红
1、备份文件
import os
import shutil

# 定义配置文件目录和备份目录的路径
config_dir = "/root/python/to/config/files/"
backup_dir = "/root/python/to/backup/"

# 遍历配置文件目录中的所有文件
for filename in os.listdir(config_dir):
    # 如果文件名以 ".conf" 结尾,则执行备份操作
    if filename.endswith('.conf'):
        # 构建完整的文件路径
        file_path = os.path.join(config_dir, filename)
        # 构建备份文件路径
        backup_path = os.path.join(backup_dir, filename)
        # 将文件复制到备份目录
        shutil.copy(file_path, backup_path)
        # 打印备份完成的消息
        print(f"Backup of {filename} completed")
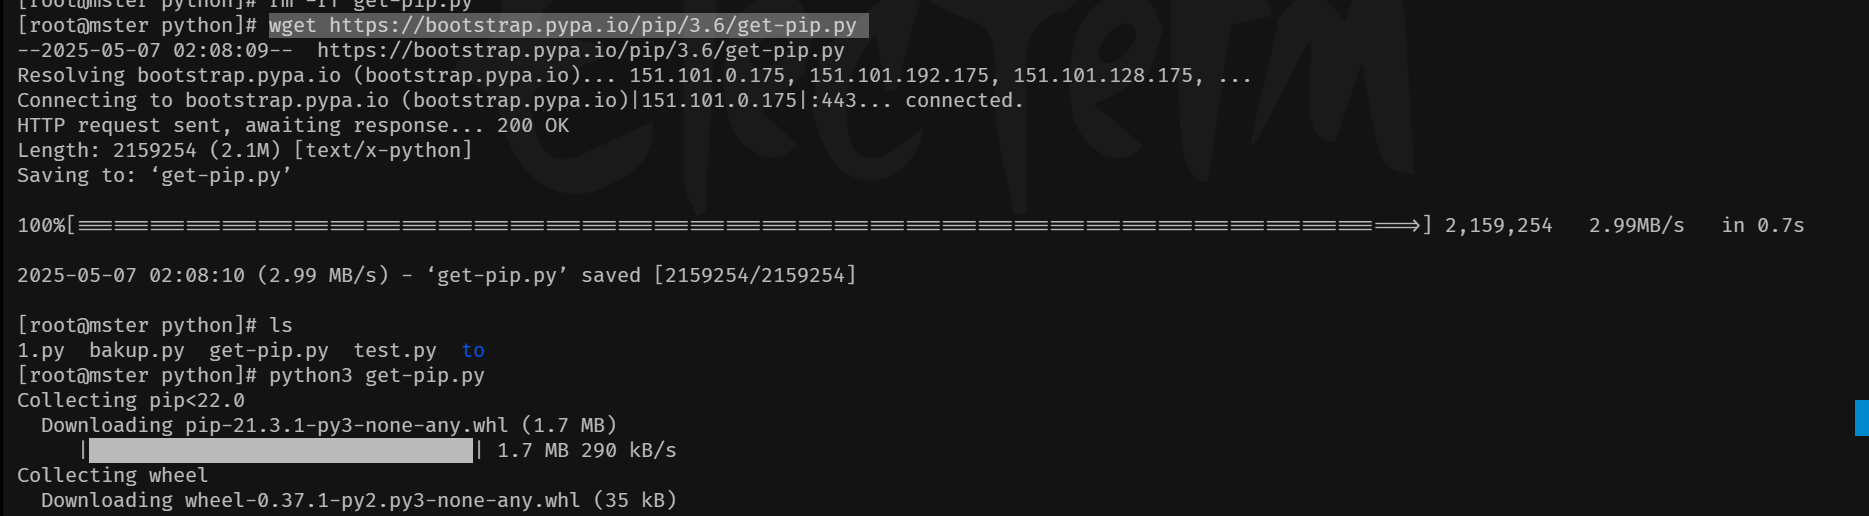
2、安装pip
- 根据不同的版本,安装不同的pip
wget https://bootstrap.pypa.io/pip/3.6/get-pip.py
python3 get-pip.py
3、将备份文件传送到远程主机上进行备份
import os
import shutil
import paramiko

# 定义配置
local_config_dir = "/root/python/to/config/files/"
remote_backup_dir = "/root/python/to/backup/"
remote_host = "192.168.1.101"
remote_username = "root"  # 根据实际情况修改用户名
remote_password = "your_password"  # 根据实际情况修改密码

# 检查本地配置目录是否存在
if not os.path.exists(local_config_dir):
    print(f"Local directory {local_config_dir} does not exist.")
    exit(1)

# 创建一个 SSH 客户端对象
ssh = paramiko.SSHClient()
ssh.set_missing_host_key_policy(paramiko.AutoAddPolicy())

try:
    # 连接远程服务器
    print(f"Connecting to {remote_host}...")
    ssh.connect(remote_host, username=remote_username, password=remote_password)

    # 创建一个 SFTP 客户端对象
    sftp = ssh.open_sftp()

    # 检查远程目录是否存在,如果不存在则创建
    print(f"Checking remote directory {remote_backup_dir}...")
    try:
        sftp.stat(remote_backup_dir)
        print(f"Directory {remote_backup_dir} already exists.")
    except IOError:
        print(f"Directory {remote_backup_dir} does not exist. Creating...")
        sftp.mkdir(remote_backup_dir)

    # 遍历本地目录中的所有文件
    for filename in os.listdir(local_config_dir):
        file_path = os.path.join(local_config_dir, filename)
        backup_path = os.path.join(remote_backup_dir, filename)

        # 检查是否为文件(忽略目录)
        if os.path.isfile(file_path):
            print(f"Transferring {file_path} to {backup_path}...")
            sftp.put(file_path, backup_path)
            print(f"Transfer of {filename} completed.")

finally:
    # 关闭 SFTP 和 SSH 连接
    print("Closing SSH connection...")
    ssh.close()
4、对历史日志进行删除
## 日志保留策略

import os
import time

# 日志文件所在的目录
log_dir = '/path/to/logs/'

# 文件的最大保留天数
days_old = 30

# 获取当前时间戳
current_time = time.time()

# 遍历日志目录中的所有文件
for filename in os.listdir(log_dir):
    # 构造文件的完整路径
    file_path = os.path.join(log_dir, filename)

    # 计算文件的年龄(以秒为单位)
    file_age = current_time - os.path.getmtime(file_path)

    # 如果文件年龄超过最大保留天数(以秒为单位),则删除该文件
    if file_age > days_old * 86400:
        os.remove(file_path)
        print(f"Deleted old log file: {filename}")
5、查看模块是否安装
import importlib
import sys  # 用于处理命令行参数

def check_modules(modules):
    """检查指定的模块是否已安装"""
    for module_name in modules:
        try:
            importlib.import_module(module_name)
            print(f"{module_name} is installed.")
        except ImportError:
            print(f"{module_name} is not installed.")

if __name__ == "__main__":
    # 通过命令行参数获取模块名称列表
    if len(sys.argv) < 2:
        print("Usage: python script.py module1 module2 ...")
        sys.exit(1)

    # 从命令行参数中提取模块名称
    modules = sys.argv[1:]

    # 检查模块是否已安装
    check_modules(modules)
- 脚本使用:
python3 test1.py time os

6、 查看系统进程
##获取当前所有的进程
import psutil

# 遍历所有进程,获取进程的 PID 和名称
for proc in psutil.process_iter(['pid', 'name']):
    # 打印每个进程的 PID 和名称
    print(f"PID: {proc.info['pid']}, 进程名: {proc.info['name']}")
7、系统资源监控
1、只监控挂载点
import psutil

def get_disk_usage():
    partitions = psutil.disk_partitions()
    for partition in partitions:
        usage = psutil.disk_usage(partition.mountpoint)
        total_gb = usage.total / (2**30)  # 转换为 GiB
        used_gb = usage.used / (2**30)    # 转换为 GiB
        free_gb = usage.free / (2**30)    # 转换为 GiB

        print(f"挂载点: {partition.mountpoint}")
        print(f"总空间: {total_gb:.2f} GiB")
        print(f"已用空间: {used_gb:.2f} GiB")
        print(f"剩余空间: {free_gb:.2f} GiB")
        print("-" * 30)

# 调用函数
get_disk_usage()
2、全部挂载点都监控
import psutil

def get_disk_usage(mountpoints):
    for mountpoint in mountpoints:
        try:
            usage = psutil.disk_usage(mountpoint)
            total_gb = usage.total / (2**30)  # 转换为 GiB
            used_gb = usage.used / (2**30)    # 转换为 GiB
            free_gb = usage.free / (2**30)    # 转换为 GiB

            print(f"挂载点: {mountpoint}")
            print(f"总空间: {total_gb:.2f} GiB")
            print(f"已用空间: {used_gb:.2f} GiB")
            print(f"剩余空间: {free_gb:.2f} GiB")
            print("-" * 30)
        except Exception as e:
            print(f"分析挂载点 {mountpoint} 出错: {e}")

# 手动指定要分析的挂载点
mountpoints = [
    '/',     # 根目录
    '/boot', # 启动分区
    '/dev',  # 设备文件挂载点
    '/tmp',  # 临时文件系统
    '/run',  # 用于运行时数据
    '/var/lib/docker/overlay2', # Docker 的 overlayfs 挂载点
    '/sys/fs/cgroup', # cgroup 文件系统
    '/proc', # proc 文件系统
    '/sys',  # 系统文件
    '/mnt'   # 用户指定的挂载点示例
]

# 调用函数
get_disk_usage(mountpoints)
3、CPU 内存 磁盘监控
import datetime
import psutil
import shutil

def get_system_report():
    report = []
    # 报告生成时间
    report.append(f"报告生成时间: {datetime.datetime.now().strftime('%m-%d')}")
    # CPU使用率
    report.append(f"CPU使用率: {psutil.cpu_percent()}%")
    # 内存使用率
    report.append(f"内存使用率: {psutil.virtual_memory().percent}%")
    # 磁盘使用情况
    total, used, free = shutil.disk_usage("/")
    report.append(f"磁盘总空间: {total // (2**30)}GiB")
    report.append(f"磁盘已用空间: {used // (2**30)}GiB")
    report.append(f"磁盘剩余空间: {free // (2**30)}GiB")
    # 返回拼接的报告
    return "\n".join(report)

# 打印系统报告
print(get_system_report())
8、用户管理
#!/usr/bin/env python3
# -*- coding: utf-8 -*-

import os
import sys
import pwd
import grp
import subprocess
from typing import List, Optional
from rich.console import Console
from rich.table import Table
from rich.prompt import Prompt, Confirm
from rich.panel import Panel
from rich import print as rprint

console = Console()

class UserManager:
    def __init__(self):
        self.console = Console()
        self.check_root_privileges()
        self.sudoers_file = "/etc/sudoers"
        self.sudoers_dir = "/etc/sudoers.d"

    def check_root_privileges(self):
        """检查是否具有root权限"""
        if os.geteuid() != 0:
            self.console.print("[red]错误:此程序需要root权限才能运行![/red]")
            self.console.print("请使用 sudo 运行此程序")
            sys.exit(1)

    def run_command(self, command: List[str]) -> tuple:
        """执行shell命令"""
        try:
            result = subprocess.run(
                command,
                stdout=subprocess.PIPE,
                stderr=subprocess.PIPE,
                universal_newlines=True,
                check=True
            )
            return True, result.stdout
        except subprocess.CalledProcessError as e:
            return False, e.stderr

    def list_users(self):
        """列出所有用户"""
        table = Table(title="系统用户列表")
        table.add_column("用户名", style="cyan")
        table.add_column("UID", style="green")
        table.add_column("GID", style="yellow")
        table.add_column("主目录", style="blue")
        table.add_column("Shell", style="magenta")

        for user in pwd.getpwall():
            table.add_row(
                user.pw_name,
                str(user.pw_uid),
                str(user.pw_gid),
                user.pw_dir,
                user.pw_shell
            )

        self.console.print(table)

    def create_user(self):
        """创建新用户"""
        try:
            username = Prompt.ask("请输入新用户名")

            # 检查用户是否已存在
            try:
                pwd.getpwnam(username)
                self.console.print(f"[red]错误:用户 {username} 已存在![/red]")
                return
            except KeyError:
                pass

            # 获取用户信息
            home_dir = Prompt.ask("请输入主目录", default=f"/home/{username}")
            shell = Prompt.ask("请输入shell", default="/bin/bash")
            create_home = Confirm.ask("是否创建主目录?", default=True)
            set_password = Confirm.ask("是否设置密码?", default=True)

            # 构建useradd命令
            cmd = ["useradd"]
            if create_home:
                cmd.append("-m")
            cmd.extend(["-d", home_dir, "-s", shell, username])

            success, output = self.run_command(cmd)
            if success:
                self.console.print(f"[green]成功创建用户 {username}[/green]")
                if set_password:
                    self.set_password(username)
            else:
                self.console.print(f"[red]创建用户失败:{output}[/red]")
        except KeyboardInterrupt:
            self.console.print("\n[yellow]已取消创建用户[/yellow]")

    def delete_user(self):
        """删除用户"""
        username = Prompt.ask("请输入要删除的用户名")

        # 检查用户是否存在
        try:
            pwd.getpwnam(username)
        except KeyError:
            self.console.print(f"[red]错误:用户 {username} 不存在![/red]")
            return

        remove_home = Confirm.ask("是否删除用户主目录?", default=True)
        cmd = ["userdel"]
        if remove_home:
            cmd.append("-r")
        cmd.append(username)

        success, output = self.run_command(cmd)
        if success:
            self.console.print(f"[green]成功删除用户 {username}[/green]")
        else:
            self.console.print(f"[red]删除用户失败:{output}[/red]")

    def set_password(self, username: Optional[str] = None):
        """设置用户密码"""
        try:
            if username is None:
                username = Prompt.ask("请输入用户名")

            # 检查用户是否存在
            try:
                pwd.getpwnam(username)
            except KeyError:
                self.console.print(f"[red]错误:用户 {username} 不存在![/red]")
                return

            # 使用chpasswd命令设置密码
            password = Prompt.ask("请输入新密码", password=True)
            confirm_password = Prompt.ask("请再次输入密码", password=True)

            if password != confirm_password:
                self.console.print("[red]错误:两次输入的密码不一致![/red]")
                return

            # 使用echo和chpasswd命令设置密码
            cmd = f"echo '{username}:{password}' | chpasswd"
            success, output = self.run_command(["bash", "-c", cmd])

            if success:
                self.console.print(f"[green]成功设置用户 {username} 的密码[/green]")
            else:
                self.console.print(f"[red]设置密码失败:{output}[/red]")
        except KeyboardInterrupt:
            self.console.print("\n[yellow]已取消设置密码[/yellow]")

    def modify_user(self):
        """修改用户信息"""
        try:
            username = Prompt.ask("请输入要修改的用户名")

            # 检查用户是否存在
            try:
                user_info = pwd.getpwnam(username)
            except KeyError:
                self.console.print(f"[red]错误:用户 {username} 不存在![/red]")
                return

            self.console.print(Panel(f"当前用户信息:\n"
                                f"用户名:{user_info.pw_name}\n"
                                f"UID:{user_info.pw_uid}\n"
                                f"GID:{user_info.pw_gid}\n"
                                f"主目录:{user_info.pw_dir}\n"
                                f"Shell:{user_info.pw_shell}"))

            new_home = Prompt.ask("请输入新的主目录", default=user_info.pw_dir)
            new_shell = Prompt.ask("请输入新的shell", default=user_info.pw_shell)

            cmd = ["usermod", "-d", new_home, "-s", new_shell, username]
            success, output = self.run_command(cmd)
            if success:
                self.console.print(f"[green]成功修改用户 {username} 的信息[/green]")
            else:
                self.console.print(f"[red]修改用户信息失败:{output}[/red]")
        except KeyboardInterrupt:
            self.console.print("\n[yellow]已取消修改用户信息[/yellow]")

    def list_groups(self):
        """列出所有用户组"""
        table = Table(title="系统用户组列表")
        table.add_column("组名", style="cyan")
        table.add_column("GID", style="green")
        table.add_column("成员", style="yellow")

        for group in grp.getgrall():
            members = ", ".join(group.gr_mem) if group.gr_mem else "无"
            table.add_row(
                group.gr_name,
                str(group.gr_gid),
                members
            )

        self.console.print(table)

    def create_group(self):
        """创建新用户组"""
        groupname = Prompt.ask("请输入新组名")

        # 检查组是否已存在
        try:
            grp.getgrnam(groupname)
            self.console.print(f"[red]错误:组 {groupname} 已存在![/red]")
            return
        except KeyError:
            pass

        cmd = ["groupadd", groupname]
        success, output = self.run_command(cmd)
        if success:
            self.console.print(f"[green]成功创建组 {groupname}[/green]")
        else:
            self.console.print(f"[red]创建组失败:{output}[/red]")

    def delete_group(self):
        """删除用户组"""
        groupname = Prompt.ask("请输入要删除的组名")

        # 检查组是否存在
        try:
            grp.getgrnam(groupname)
        except KeyError:
            self.console.print(f"[red]错误:组 {groupname} 不存在![/red]")
            return

        cmd = ["groupdel", groupname]
        success, output = self.run_command(cmd)
        if success:
            self.console.print(f"[green]成功删除组 {groupname}[/green]")
        else:
            self.console.print(f"[red]删除组失败:{output}[/red]")

    def add_user_to_group(self):
        """将用户添加到组"""
        username = Prompt.ask("请输入用户名")
        groupname = Prompt.ask("请输入组名")

        # 检查用户和组是否存在
        try:
            pwd.getpwnam(username)
        except KeyError:
            self.console.print(f"[red]错误:用户 {username} 不存在![/red]")
            return

        try:
            grp.getgrnam(groupname)
        except KeyError:
            self.console.print(f"[red]错误:组 {groupname} 不存在![/red]")
            return

        cmd = ["usermod", "-a", "-G", groupname, username]
        success, output = self.run_command(cmd)
        if success:
            self.console.print(f"[green]成功将用户 {username} 添加到组 {groupname}[/green]")
        else:
            self.console.print(f"[red]添加用户到组失败:{output}[/red]")

    def check_sudo_access(self, username: str) -> bool:
        """检查用户是否有sudo权限"""
        try:
            # 检查sudoers文件
            cmd = f"grep -E '^{username}|^%.*{username}' {self.sudoers_file}"
            success, output = self.run_command(["bash", "-c", cmd])
            if success and output.strip():
                return True

            # 检查sudoers.d目录下的文件
            cmd = f"grep -r -E '^{username}|^%.*{username}' {self.sudoers_dir}"
            success, output = self.run_command(["bash", "-c", cmd])
            if success and output.strip():
                return True

            return False
        except:
            return False

    def list_sudo_users(self):
        """列出所有具有sudo权限的用户"""
        table = Table(title="Sudo权限用户列表")
        table.add_column("用户名", style="cyan")
        table.add_column("权限来源", style="green")
        table.add_column("权限详情", style="yellow")

        # 检查每个用户
        for user in pwd.getpwall():
            username = user.pw_name
            if self.check_sudo_access(username):
                # 查找权限来源
                cmd = f"grep -r -E '^{username}|^%.*{username}' {self.sudoers_file} {self.sudoers_dir}"
                success, output = self.run_command(["bash", "-c", cmd])
                if success:
                    for line in output.strip().split('\n'):
                        if line:
                            source, *content = line.split(':', 1)
                            content = content[0] if content else "N/A"
                            source = source.replace(self.sudoers_file, "sudoers")
                            source = source.replace(self.sudoers_dir + '/', "sudoers.d/")
                            table.add_row(username, source, content.strip())

        self.console.print(table)

    def grant_sudo_access(self):
        """授予用户sudo权限"""
        username = Prompt.ask("请输入要授予sudo权限的用户名")

        try:
            pwd.getpwnam(username)
        except KeyError:
            self.console.print(f"[red]错误:用户 {username} 不存在![/red]")
            return

        if self.check_sudo_access(username):
            self.console.print(f"[yellow]用户 {username} 已经具有sudo权限[/yellow]")
            return

        # 创建新的sudoers文件
        filename = f"{self.sudoers_dir}/{username}"
        content = f"{username} ALL=(ALL) ALL"

        try:
            # 首先写入临时文件
            temp_file = f"{filename}.tmp"
            with open(temp_file, 'w') as f:
                f.write(content + '\n')

            # 检查语法
            success, output = self.run_command(["visudo", "-c", "-f", temp_file])
            if not success:
                self.console.print(f"[red]错误:sudoers语法检查失败:{output}[/red]")
                os.unlink(temp_file)
                return

            # 移动到最终位置
            os.rename(temp_file, filename)
            os.chmod(filename, 0o440)
            self.console.print(f"[green]成功授予用户 {username} sudo权限[/green]")
        except Exception as e:
            self.console.print(f"[red]授予sudo权限失败:{str(e)}[/red]")

    def revoke_sudo_access(self):
        """撤销用户的sudo权限"""
        username = Prompt.ask("请输入要撤销sudo权限的用户名")

        try:
            pwd.getpwnam(username)
        except KeyError:
            self.console.print(f"[red]错误:用户 {username} 不存在![/red]")
            return

        if not self.check_sudo_access(username):
            self.console.print(f"[yellow]用户 {username} 没有sudo权限[/yellow]")
            return

        # 查找并删除sudoers配置
        filename = f"{self.sudoers_dir}/{username}"
        if os.path.exists(filename):
            try:
                os.unlink(filename)
                self.console.print(f"[green]成功撤销用户 {username} 的sudo权限[/green]")
            except Exception as e:
                self.console.print(f"[red]撤销sudo权限失败:{str(e)}[/red]")
        else:
            self.console.print(f"[yellow]警告:需要手动编辑 {self.sudoers_file} 来撤销权限[/yellow]")

def main_menu():
    """显示主菜单"""
    manager = UserManager()

    while True:
        try:
            console.clear()
            console.print(Panel.fit(
                "[bold cyan]Linux用户管理[/bold cyan]\n"
                "1. 列出所有用户\n"
                "2. 创建新用户\n"
                "3. 删除用户\n"
                "4. 修改用户信息\n"
                "5. 设置用户密码\n"
                "6. 列出所有用户组\n"
                "7. 创建新用户组\n"
                "8. 删除用户组\n"
                "9. 将用户添加到组\n"
                "10. 列出所有具有sudo权限的用户\n"
                "11. 授予用户sudo权限\n"
                "12. 撤销用户的sudo权限\n"
                "0. 退出程序",
                title="主菜单"
            ))

            choice = Prompt.ask("请选择操作", choices=["0", "1", "2", "3", "4", "5", "6", "7", "8", "9", "10", "11", "12"])

            if choice == "0":
                console.print("[yellow]感谢使用,再见![/yellow]")
                break

            try:
                if choice == "1":
                    manager.list_users()
                elif choice == "2":
                    manager.create_user()
                elif choice == "3":
                    manager.delete_user()
                elif choice == "4":
                    manager.modify_user()
                elif choice == "5":
                    manager.set_password()
                elif choice == "6":
                    manager.list_groups()
                elif choice == "7":
                    manager.create_group()
                elif choice == "8":
                    manager.delete_group()
                elif choice == "9":
                    manager.add_user_to_group()
                elif choice == "10":
                    manager.list_sudo_users()
                elif choice == "11":
                    manager.grant_sudo_access()
                elif choice == "12":
                    manager.revoke_sudo_access()

                Prompt.ask("\n按回车键继续...")

            except KeyboardInterrupt:
                console.print("\n[yellow]操作已取消[/yellow]")
                try:
                    if Prompt.ask("\n是否返回主菜单?", choices=["y", "n"], default="y") == "n":
                        console.print("[yellow]感谢使用,再见![/yellow]")
                        return
                except KeyboardInterrupt:
                    console.print("\n[yellow]感谢使用,再见![/yellow]")
                    return

        except KeyboardInterrupt:
            console.print("\n[yellow]感谢使用,再见![/yellow]")
            break

if __name__ == "__main__":
    try:
        main_menu()
    except Exception as e:
        console.print(f"\n[red]发生错误:{str(e)}[/red]")
        sys.exit(1)
vim requirements.txt
rich==12.6.0
click==8.0.4

##安装模块: pip3 install -r  requirements.txt
9、 网络检测
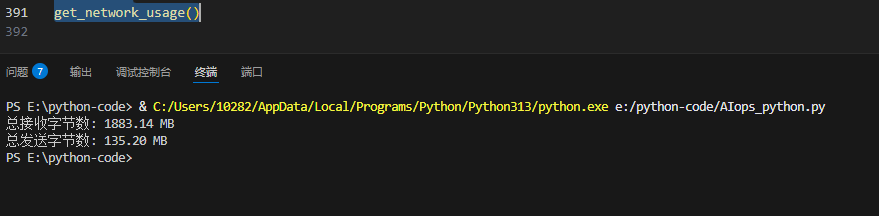
1、网络输入输出总量监测
import psutil

def get_network_usage():
    """
    获取并打印网络 I/O 模块的使用情况,包括发送和接收的字节数(单位:MB)。
    """
    try:
        # 获取网络 I/O 统计信息
        net_io = psutil.net_io_counters()

        # 计算发送和接收的字节数(转换为 MB)
        bytes_received = net_io.bytes_recv / (2**20)  # 转换为 MB
        bytes_sent = net_io.bytes_sent / (2**20)     # 转换为 MB

        # 输出结果
        print(f"总接收字节数: {bytes_received:.2f} MB")
        print(f"总发送字节数: {bytes_sent:.2f} MB")

    except Exception as e:
        # 捕获异常并输出错误信息
        print(f"获取网络 I/O 使用信息失败: {e}")

# 调用函数
get_network_usage()
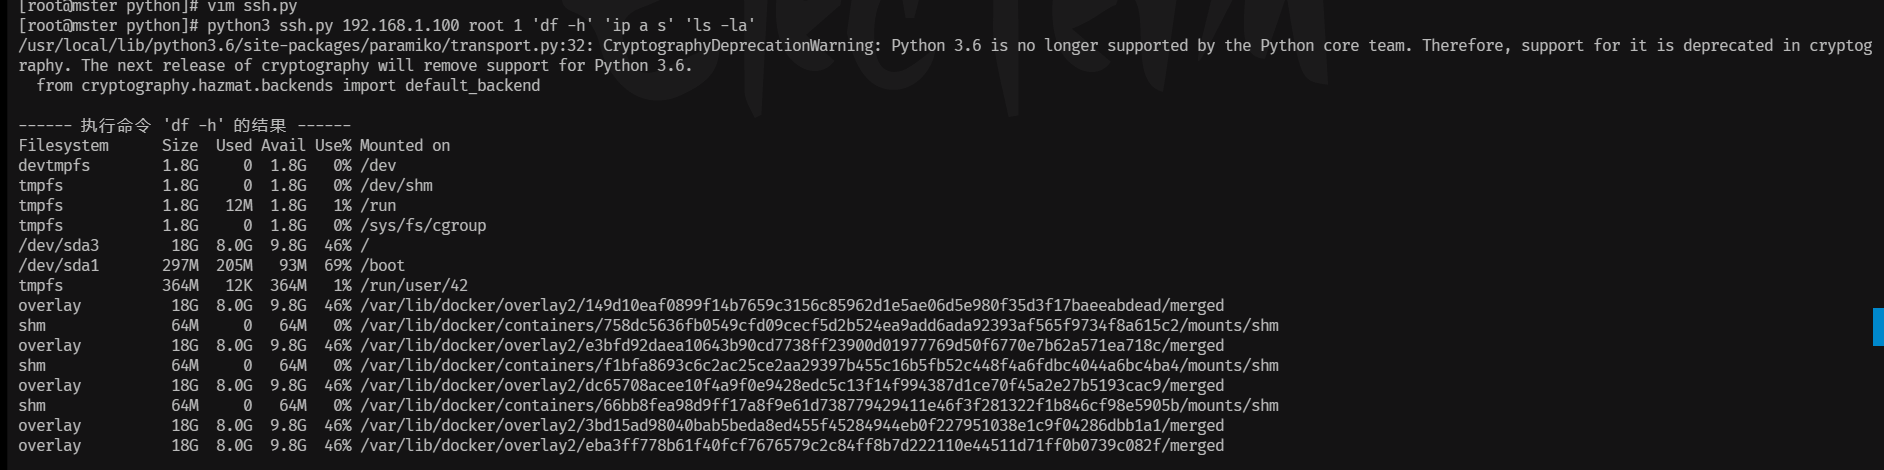
10、远程控制主机,并执行命令
import paramiko
import sys

# 检查命令行参数是否正确
if len(sys.argv) < 5:
    print("Usage: python ssh.py <hostname> <username> <password> <command1> [command2] [command3] ...")
    sys.exit(1)

# 从命令行参数中提取主机信息和命令
hostname = sys.argv[1]  # 主机 IP 地址
username = sys.argv[2]  # 登录用户名
password = sys.argv[3]  # 登录密码
commands = sys.argv[4:]  # 命令列表,从第四个参数开始

# 创建 SSH 客户端对象
ssh = paramiko.SSHClient()

# 设置自动添加主机密钥策略
ssh.set_missing_host_key_policy(paramiko.AutoAddPolicy())

# 连接到远程主机
try:
    ssh.connect(
        hostname=hostname,  # 主机 IP 地址
        username=username,  # 登录用户名
        password=password   # 登录密码
    )

    # 依次执行命令并打印输出
    for idx, command in enumerate(commands):
        print(f"\n------ 执行命令 '{command}' 的结果 ------")
        try:
            stdin, stdout, stderr = ssh.exec_command(command)  # 执行命令并获取输出

            # 打印标准输出
            print(stdout.read().decode('utf-8'))

            # 打印标准错误(如果存在)
            error_output = stderr.read().decode('utf-8')
            if error_output:
                print(f"--- 错误输出 ---\n{error_output}")

            # 显式关闭 stdin, stdout, stderr
            stdin.close()
            stdout.close()
            stderr.close()

        except Exception as e:
            print(f"执行命令 '{command}' 时发生错误: {e}")

finally:
    # 确保关闭 SSH 连接
    ssh.close()
# 执行方法:
python3 ssh.py 192.168.1.100 root 1 'df -h' 'ip a s' 'ls -la'
11、服务监控,(状态,重启,关闭)
1、Nginx服务监控
import subprocess

def run_cmd(cmd):
    try:
        output = subprocess.run(["systemctl", "is-active", "nginx"], capture_output=True, text=True, check=True)
        return output.stdout.strip() == "active"
    except subprocess.CalledProcessError as e:
        return False

def restart_nginx():
    try:
        subprocess.run(["systemctl", "restart", "nginx"], check=True)
        print("Nginx restarted successfully")
        return True
    except subprocess.CalledProcessError as e:
        print("Failed to restart Nginx")
        print(e.stderr)
        return False

if __name__ == "__main__":
    if run_cmd("systemctl active nginx"):
        print("Nginx is active")
    else:
        print("Nginx is not active")
        if restart_nginx():
            print("Nginx restarted successfully")
        else:
            print("Failed to restart Nginx")
12、CPU 监控
# 导入paramiko模块,用于SSH连接
import paramiko
# 导入time模块,用于处理时间
import time
# 导入smtplib模块,用于发送邮件
import smtplib
# 导入MIMEText类,用于创建邮件正文
from email.mime.text import MIMEText
# 导入MIMEMultipart库,用于创建邮件
from email.mime.multipart import MIMEMultipart
# 导入signal库,用于处理信号
import signal

# 定义一些常量
SSH_HOST = "192.168.1.100"  # 监控的远程主机IP
SSH_PORT = 22  # SSH端口
SSH_USERNAME = "root"  # SSH用户名
SSH_PASSWORD = "password123"  # SSH密码
CPU_THRESHOLD = 80  # CPU使用率阈值(%)

# 邮件配置
SMTP_SERVER = "smtp.example.com"  # SMTP服务器地址
SMTP_PORT = 587  # SMTP端口
SMTP_USERNAME = "sender@example.com"  # SMTP用户名
SMTP_PASSWORD = "your_email_password"  # SMTP密码
RECIPIENT_EMAIL = "admin@example.com"  # 接收邮箱

# 信号处理函数,用于优雅退出
def graceful_exit(signal, frame):
    print("\n接收到退出信号,程序优雅退出。")
    client.close()
    exit(0)

# 发送邮件通知
def send_email(cpu_usage, restarted_process):
    message = MIMEText(
        f"高CPU占用进程已被重启:{restarted_process}\n当前CPU使用率:{cpu_usage}%",
        "plain",
        "utf-8"
    )
    message["From"] = SMTP_USERNAME
    message["To"] = RECIPIENT_EMAIL
    message["Subject"] = "高CPU使用率警报"

    try:
        with smtplib.SMTP(SMTP_SERVER, SMTP_PORT) as server:
            server.starttls()  # 启用TLS加密
            server.login(SMTP_USERNAME, SMTP_PASSWORD)
            server.sendmail(SMTP_USERNAME, RECIPIENT_EMAIL, message.as_string())
            print("已发送邮件通知。")
    except Exception as e:
        print(f"发送邮件失败:{e}")

# 主功能函数,监控CPU使用率并处理
def monitor_cpu_usage():
    try:
        # 创建SSH客户端
        client = paramiko.SSHClient()
        client.set_missing_host_key_policy(paramiko.AutoAddPolicy())
        client.connect(SSH_HOST, port=SSH_PORT, username=SSH_USERNAME, password=SSH_PASSWORD)

        while True:
            # 执行命令获取CPU使用率
            stdin, stdout, stderr = client.exec_command("mpstat 1 1 | grep all | awk '{print $12}'")
            cpu_usage = float(stdout.read().decode().strip())

            # 判断CPU使用率是否超过阈值
            if cpu_usage > CPU_THRESHOLD:
                print(f"高CPU警报:CPU使用率为 {cpu_usage}%(超过阈值 {CPU_THRESHOLD}%)")
                # 执行重启操作(这里假设有一个重启命令)
                stdin, stdout, stderr = client.exec_command("pkill -9 high_cpu_process && sleep 1 && /start_high_cpu_process.sh")
                if stdout.channel.exit_status == 0:
                    print("进程已重启。")
                    # 发送邮件通知
                    send_email(cpu_usage, "high_cpu_process")
                else:
                    print("重启失败。")
                    print(stderr.read().decode().strip())
            else:
                print(f"当前CPU使用率:{cpu_usage}%")

            # 每5秒检查一次
            time.sleep(5)

    except paramiko.SSHException as e:
        print(f"SSH连接失败:{e}")
    except Exception as e:
        print(f"发生错误:{e}")

    finally:
        client.close()

# 设置优雅退出的信号处理
signal.signal(signal.SIGINT, graceful_exit)
signal.signal(signal.SIGTERM, graceful_exit)

# 主程序入口
if __name__ == "__main__":
    print("监控程序已启动,按 Ctrl+C 优雅退出。")
    monitor_cpu_usage()
13、 使用进度条,查询任务执行速度
"""
from tqdm import tqdm
import time

try:
    # 创建进度条实例
    with tqdm(total=100, desc="山海摸鱼人正在工作") as pbar:
        for i in range(10):
            time.sleep(0.5)  # 模拟耗时任务
            pbar.update(10)  # 每次更新10%
            pbar.set_postfix({"状态": "努力摸鱼中"})
except KeyboardInterrupt:
    print("\n检测到用户中断,山海摸鱼人提前下班啦!")
finally:
    print("清理工作完成")

"""

"""
• 使用with语句可以确保进度条正确关闭
• try-except捕获KeyboardInterrupt异常
• set_postfix用于显示额外状态信息
• finally块确保资源清理一定会执行
"""

from tqdm import tqdm
from multiprocessing import Pool, Manager
import time

def worker(task_id, queue):
    """模拟工作进程,通过 Queue 发送进度"""
    for _ in range(10):
        time.sleep(0.1 * (task_id + 1))  # 模拟耗时任务
        queue.put(1)  # 每次迭代发送一个信号

def run_parallel_tasks():
    tasks = 5
    total = tasks * 10

    with tqdm(total=total, desc="协作进度") as pbar:
        with Manager() as manager:
            queue = manager.Queue()  # 创建进程安全的队列
            pool = Pool(tasks)  # 创建进程池
            result = pool.starmap_async(worker, [(i, queue) for i in range(tasks)])  # 异步启动所有任务

            # 从队列中读取进度
            for _ in range(total):
                queue.get()  # 阻塞直到收到一个信号
                pbar.update(1)

            # 确保所有子进程完成
            result.wait()

if __name__ == '__main__':
    run_parallel_tasks()
14、使用pyecharts进行图表制作
"""
from pyecharts.charts import Line
from pyecharts import options as opts

# 折线图
line = (
    Line()
    .add_xaxis(["周一", "周二", "周三", "周四", "周五", "周六", "周日"])
    .add_yaxis("系列1", [120, 200, 150, 80, 70, 110, 130])
    .set_global_opts(title_opts=opts.TitleOpts(title="折线图"))
)
line.render("line.html")
"""

""""
from pyecharts.charts import Bar
from pyecharts import options as opts

# 柱状图
bar = (
    Bar()
    .add_xaxis(["衬衫", "羊毛衫", "雪纺衫", "裤子", "高跟鞋", "袜子"])
    .add_yaxis("商家A", [5, 20, 36, 10, 75, 90])
    .set_global_opts(title_opts=opts.TitleOpts(title="柱状图"))
)
bar.render("line.html")

"""

"""
from pyecharts.charts import Scatter
from pyecharts import options as opts

# 散点图
scatter = (
    Scatter()
    .add_xaxis([1, 2, 3, 4, 5])
    .add_yaxis("series1", [10, 20, 30, 40, 50])
    .set_global_opts(title_opts=opts.TitleOpts(title="散点图"))
)
scatter.render("line.html")

"""

"""
from pyecharts.charts import Pie
from pyecharts import options as opts

# 饼图
pie = (
    Pie()
    .add("", [list(z) for z in zip(["衬衫", "羊毛衫", "雪纺衫", "裤子", "高跟鞋", "袜子"], [5, 20, 36, 10, 75, 90])])
    .set_global_opts(title_opts=opts.TitleOpts(title="饼图"))
    .set_series_opts(label_opts=opts.LabelOpts(formatter="{b}: {c} ({d}%)"))
)
pie.render("pie.html")

"""

"""
from pyecharts.charts import Map
from pyecharts import options as opts

# 地图(以中国地图为例)
map_chart = (
    Map()
    .add("商家A", [list(z) for z in zip(['北京', '上海', '广东'], [55, 60, 70])], "china")
    .set_global_opts(
        title_opts=opts.TitleOpts(title="地图"),
        visualmap_opts=opts.VisualMapOpts(max_=200)
    )
)
map_chart.render("map.html")

"""

""""
from pyecharts.charts import WordCloud
from pyecharts import options as opts

# 词云图
words = [
    ("Sam S Club", 10000),
    ("Macys", 6181),
    ("Amy Schumer", 4386),
]

wordcloud = (
    WordCloud()
    .add("", words, word_size_range=[20, 100], shape='circle')
    .set_global_opts(title_opts=opts.TitleOpts(title="词云图"))
)
wordcloud.render("wordcloud.html")

"""

"""
from pyecharts.charts import Gauge
from pyecharts import options as opts

# 仪表盘
gauge = (
    Gauge()
    .add("", [("完成率", 88.99)])
    .set_global_opts(title_opts=opts.TitleOpts(title="仪表盘"))
)
gauge.render("gauge.html")

"""
"""
from pyecharts.charts import Funnel
from pyecharts import options as opts

# 漏斗图
funnel = (
    Funnel()
    .add("商品", [list(z) for z in zip(["展现", "点击", "访问", "咨询", "订单"], [100, 80, 60, 40, 20])])
    .set_global_opts(title_opts=opts.TitleOpts(title="漏斗图"))
)
funnel.render("funnel.html")

"""

""""
from pyecharts.charts import Tree, Parallel
from pyecharts import options as opts

# 树图
data = [
    {
        "name": "树节点",
        "children": [
            {"name": "子节点1"},
            {"name": "子节点2", "children": [{"name": "孙子节点"}]}
        ]
    }
]

tree = (
    Tree()
    .add("", data)
    .set_global_opts(title_opts=opts.TitleOpts(title="树图"))
)
tree.render("tree.html")

# 平行坐标系图
parallel_data = [
    ['一部', 99, 92, 95, 95],
    ['二部', 99, 92, 95, 95],
]

parallel = (
    Parallel()
    .add_schema(
        [
            opts.ParallelAxisOpts(dim=0, name="部门"),
            opts.ParallelAxisOpts(dim=1, name="综合素质", type_="value"),
            opts.ParallelAxisOpts(dim=2, name="学科1", type_="value"),
            opts.ParallelAxisOpts(dim=3, name="学科2", type_="value"),
            opts.ParallelAxisOpts(dim=4, name="学科3", type_="value"),
        ]
    )
    .add("parallel", parallel_data)
    .set_global_opts(title_opts=opts.TitleOpts(title="平行坐标系图"))
)
parallel.render("parallel.html")


"""

"""
from pyecharts.charts import Scatter3D
from pyecharts import options as opts

# 示例数据
data = [
    [1, 1, 1],
    [2, 2, 2],
    [3, 3, 3],
    [4, 4, 4],
    [5, 5, 5]
]

scatter3d = (
    Scatter3D()
    .add("", data)
    .set_global_opts(
        title_opts=opts.TitleOpts(title="3D 散点图"),
        visualmap_opts=opts.VisualMapOpts(range_color=['#313695', '#4575b4', '#74add1', '#abd9e9', '#e0f3f8', '#ffffbf', '#fee090', '#fdae61', '#f46d43', '#d73027', '#a50026'])
    )
)
scatter3d.render("scatter3d.html")


from pyecharts.charts import Bar, Timeline
from pyecharts import options as opts

# 时间线图
timeline = Timeline()

for i in range(2015, 2020):
    bar = (
        Bar()
        .add_xaxis(["衬衫", "羊毛衫", "雪纺衫", "裤子", "高跟鞋", "袜子"])
        .add_yaxis("商家A", [5 * i, 20 * i, 36 * i, 10 * i, 75 * i, 90 * i])
        .set_global_opts(title_opts=opts.TitleOpts(title="{}年".format(i)))
    )
    timeline.add(bar, "{}年".format(i))

timeline.render("timeline.html")


from pyecharts.charts import Geo
from pyecharts import options as opts

# 地理坐标系图
geo = (
    Geo()
    .add_schema(maptype="china")
    .add("geo", [("北京", 55), ("上海", 60), ("广州", 70)])
    .set_series_opts(label_opts=opts.LabelOpts(is_show=False))
    .set_global_opts(
        visualmap_opts=opts.VisualMapOpts(),
        title_opts=opts.TitleOpts(title="地理坐标系图")
    )
)
geo.render("geo.html")


### 平行坐标系图

from pyecharts.charts import Parallel
from pyecharts import options as opts

# 平行坐标系图
parallel_data = [
    ['一部', 99, 92, 95, 95],
    ['二部', 99, 92, 95, 95],
]

parallel = (
    Parallel()
    .add_schema(
        [
            opts.ParallelAxisOpts(dim=0, name="部门"),
            opts.ParallelAxisOpts(dim=1, name="综合素质", type_="value"),
            opts.ParallelAxisOpts(dim=2, name="学科1", type_="value"),
            opts.ParallelAxisOpts(dim=3, name="学科2", type_="value"),
            opts.ParallelAxisOpts(dim=4, name="学科3", type_="value"),
        ]
    )
    .add("parallel", parallel_data)
    .set_global_opts(title_opts=opts.TitleOpts(title="平行坐标系图"))
)
parallel.render("parallel.html")


"""

"""
from pyecharts.charts import Surface3D
from pyecharts import options as opts
import numpy as np

x_data = y_data = list(range(-5, 5))
z_data = [[y, x, np.sin(np.sqrt(x ** 2 + y ** 2))] for x in x_data for y in y_data]

surface3d = (
    Surface3D()
    .add(
        "",
        z_data,
        shading="color",
        xaxis3d_opts=opts.Axis3DOpts(type_="value"),
        yaxis3d_opts=opts.Axis3DOpts(type_="value"),
        zaxis3d_opts=opts.Axis3DOpts(type_="value"),
    )
    .set_global_opts(
        title_opts=opts.TitleOpts(title="3D 曲面图(近似)"),
        visualmap_opts=opts.VisualMapOpts(max_=1, min_=-1, range_color=['#313695', '#4575b4', '#74add1', '#abd9e9', '#e0f3f8', '#ffffbf', '#fee090', '#fdae61', '#f46d43', '#d73027', '#a50026'])
    )
)
surface3d.render("surface3d.html")

"""

"""
from pyecharts.charts import Surface3D
from pyecharts import options as opts
import numpy as np

x_data = y_data = list(range(-5, 5))
z_data = [[y, x, np.sin(np.sqrt(x ** 2 + y ** 2))] for x in x_data for y in y_data]

surface3d = (
    Surface3D()
    .add(
        "",
        z_data,
        shading="color",
        xaxis3d_opts=opts.Axis3DOpts(type_="value"),
        yaxis3d_opts=opts.Axis3DOpts(type_="value"),
        zaxis3d_opts=opts.Axis3DOpts(type_="value"),
    )
    .set_global_opts(
        title_opts=opts.TitleOpts(title="3D 曲面图(近似)"),
        visualmap_opts=opts.VisualMapOpts(max_=1, min_=-1, range_color=['#313695', '#4575b4', '#74add1', '#abd9e9', '#e0f3f8', '#ffffbf', '#fee090', '#fdae61', '#f46d43', '#d73027', '#a50026'])
    )
)
surface3d.render("surface3d.html")

"""
"""
from pyecharts.charts import Surface3D
from pyecharts import options as opts
import numpy as np

x_data = y_data = list(range(-5, 5))
z_data = [[y, x, np.sin(np.sqrt(x ** 2 + y ** 2))] for x in x_data for y in y_data]

surface3d = (
    Surface3D()
    .add(
        "",
        z_data,
        shading="color",
        xaxis3d_opts=opts.Axis3DOpts(type_="value"),
        yaxis3d_opts=opts.Axis3DOpts(type_="value"),
        zaxis3d_opts=opts.Axis3DOpts(type_="value"),
    )
    .set_global_opts(
        title_opts=opts.TitleOpts(title="3D 曲面图(近似)"),
        visualmap_opts=opts.VisualMapOpts(max_=1, min_=-1, range_color=['#313695', '#4575b4', '#74add1', '#abd9e9', '#e0f3f8', '#ffffbf', '#fee090', '#fdae61', '#f46d43', '#d73027', '#a50026'])
    )
)
surface3d.render("surface3d.html")

"""
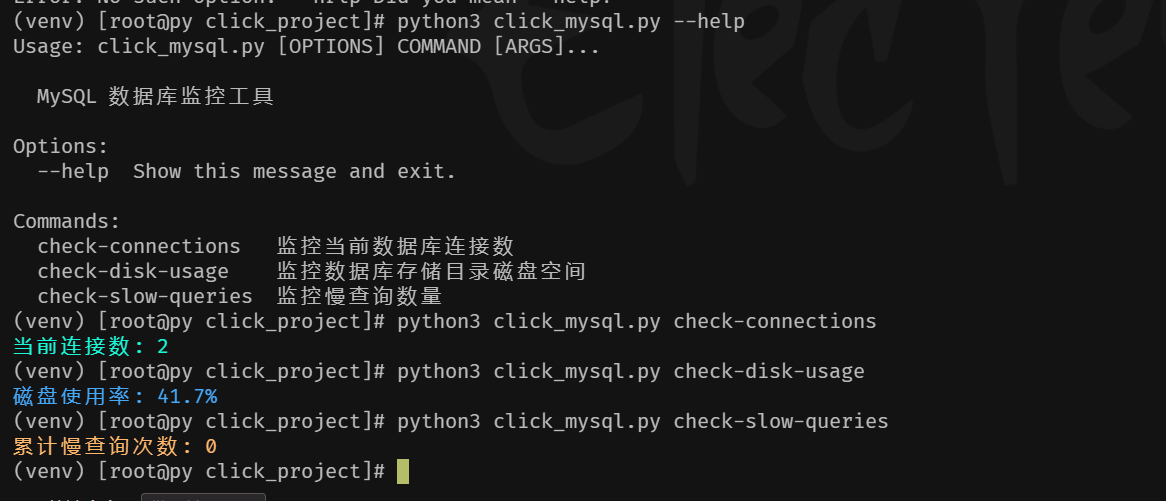
15、使用click库做数据库监控
import click
import mysql.connector
from mysql.connector import Error
import shutil

# 数据库配置(可通过命令行参数覆盖)
DEFAULT_CONFIG = {
    "host": "127.0.0.1",
    "user": "root",
    "password": "Suking@987#",
    "port": 3306,
    "database": "mysql"
}

@click.group()
def cli():
    """MySQL 数据库监控工具"""
    pass

@cli.command()
@click.option('--max-conn', default=100, help='最大允许连接数阈值,默认100')
def check_connections(max_conn):
    """监控当前数据库连接数"""
    try:
        conn = mysql.connector.connect(**DEFAULT_CONFIG)
        cursor = conn.cursor()
        cursor.execute("SHOW GLOBAL STATUS LIKE 'Threads_connected'")
        current_conn = cursor.fetchone()[1]

        click.secho(f"当前连接数: {current_conn}", fg='green')
        if int(current_conn) > max_conn:
            click.secho(f"⚠️ 警告:连接数超过阈值 ({max_conn})!", fg='red', blink=True)
            raise click.Abort()
    except Error as e:
        click.secho(f"数据库连接失败: {e}", fg='red')
        raise click.Abort()
    finally:
        if conn.is_connected():
            cursor.close()
            conn.close()

@cli.command()
@click.option('--slow-threshold', default=1, help='慢查询阈值(秒),默认1秒')
def check_slow_queries(slow_threshold):
    """监控慢查询数量"""
    try:
        conn = mysql.connector.connect(**DEFAULT_CONFIG)
        cursor = conn.cursor()
        cursor.execute("SHOW GLOBAL STATUS LIKE 'Slow_queries'")
        slow_queries = cursor.fetchone()[1]

        click.secho(f"累计慢查询次数: {slow_queries}", fg='yellow')
        if int(slow_queries) > 0:
            click.secho(f"⚠️ 存在慢查询(阈值={slow_threshold}s)", fg='red')
    except Error as e:
        click.secho(f"数据库连接失败: {e}", fg='red')
        raise click.Abort()
    finally:
        if conn.is_connected():
            cursor.close()
            conn.close()

@cli.command()
@click.option('--disk-threshold', default=90, help='磁盘使用率阈值(百分比),默认90%')
def check_disk_usage(disk_threshold):
    """监控数据库存储目录磁盘空间"""
    total, used, free = shutil.disk_usage("/var/lib/mysql")
    usage_percent = (used / total) * 100
    click.secho(f"磁盘使用率: {usage_percent:.1f}%", fg='blue')
    if usage_percent > disk_threshold:
        click.secho(f"⚠️ 磁盘空间不足(超过{disk_threshold}%)", fg='red')
        raise click.Abort()

if __name__ == '__main__':
    cli()
16、json文件检查
import json

# 读取文件内容
with open('conn.json', 'r') as file:
    content = file.read()
    print("读取的内容:")
    print(content)

# 尝试解析 JSON
try:
    conf = json.loads(content)
    print("解析成功:")
    print(conf)
except json.JSONDecodeError as e:
    print("JSON 解析错误:")
    print(e)
17 、yaml 语法检查
import yaml

def validate_yaml_syntax(file_path):
    """验证 YAML 语法有效性"""
    try:
        with open(file_path, 'r') as f:
            yaml.safe_load(f)
        return True
    except yaml.YAMLError as e:
        print(f"语法错误: {e.problem} (行号: {e.problem_mark.line+1})")  # 精准定位错误[7](@ref)
        return False
    except FileNotFoundError:
        print(f"错误: 文件 {file_path} 不存在")
        return False

def validate_k8s_pod(file_path):
    """验证 Kubernetes Pod 结构"""
    try:
        with open(file_path, 'r') as f:
            data = yaml.safe_load(f)

        required = ['apiVersion', 'kind', 'metadata', 'spec']
        for field in required:
            if field not in data:
                print(f"关键字段缺失: {field}")
                return False

        if data['kind'].lower() != 'pod':
            print("Kind 必须是 Pod")
            return False

        containers = data['spec'].get('containers', [])
        if not containers:
            print("必须定义至少一个容器")
            return False

        for idx, container in enumerate(containers):
            if 'name' not in container:
                print(f"容器 {idx} 缺少 name 字段")
                return False
            if 'image' not in container:
                print(f"容器 {container.get('name')} 缺少 image 字段")
                return False

        print("Pod 结构验证通过")
        return True
    except Exception as e:
        print(f"验证异常: {str(e)}")
        return False

# 示例调用
if __name__ == "__main__":
    yaml_file = "/root/yaml/pod.yaml"
    if validate_yaml_syntax(yaml_file):
        validate_k8s_pod(yaml_file)
18、 使用click 执行远程主机命令
import click
import paramiko
from paramiko import SSHClient, AutoAddPolicy

@click.group()
def cli():
    """远程服务器管理工具"""
    pass

@cli.command()
@click.option('--host', required=True, help='远程服务器IP')
@click.option('--port', default=22, help='SSH端口,默认22')
@click.option('--user', default='root', help='用户名,默认root')
@click.option('--password', prompt=True, hide_input=True, help='SSH密码')
@click.option('--command', required=True, help='要执行的远程命令')
def exec_remote(host, port, user, password, command):
    """通过SSH执行远程命令"""
    client = SSHClient()
    client.set_missing_host_key_policy(AutoAddPolicy())

    try:
        # 连接服务器
        client.connect(host, port=port, username=user, password=password)

        # 执行命令
        stdin, stdout, stderr = client.exec_command(command)
        exit_code = stdout.channel.recv_exit_status()

        # 输出结果
        click.secho(f"Exit Code: {exit_code}", fg='blue')
        if stdout:
            click.echo("标准输出:")
            click.secho(stdout.read().decode(), fg='green')
        if stderr:
            click.echo("错误输出:")
            click.secho(stderr.read().decode(), fg='red')

    except Exception as e:
        click.secho(f"连接或执行失败: {str(e)}", fg='red', bold=True)
    finally:
        client.close()

if __name__ == '__main__':
    cli()
19、 click库执行多个IP多个命令
import click
import paramiko
from paramiko import SSHClient, AutoAddPolicy
from time import sleep

# 全局配置(超时时间、命令间隔)
CONFIG = {"timeout": 10, "cmd_interval": 0.5}

@click.group()
def cli():
    """远程服务器批量管理工具"""
    pass

def execute_commands(host, port, user, password, commands):
    """单台服务器执行多命令的核心逻辑"""
    client = SSHClient()
    client.set_missing_host_key_policy(AutoAddPolicy())
    try:
        client.connect(host, port=port, username=user, password=password, timeout=CONFIG["timeout"])
        click.secho(f"\n🔗 连接成功:{user}@{host}:{port}", fg="cyan", bold=True)

        # 按顺序执行所有命令
        for idx, cmd in enumerate(commands, 1):
            click.echo(f"\n🚀 执行命令 [{idx}/{len(commands)}]: {click.style(cmd, fg='yellow')}")
            stdin, stdout, stderr = client.exec_command(cmd)
            exit_code = stdout.channel.recv_exit_status()

            # 输出结果解析
            click.secho(f"Exit Code: {exit_code}", fg="blue")
            if stdout:
                click.echo("标准输出:")
                click.secho(stdout.read().decode().strip(), fg="green")
            if stderr:
                click.echo("错误输出:")
                click.secho(stderr.read().decode().strip(), fg="red")

            sleep(CONFIG["cmd_interval"])  # 避免命令执行过快

    except Exception as e:
        click.secho(f"❌ 连接或执行失败:{str(e)}", fg="red", bold=True)
    finally:
        client.close()
        click.echo("━" * 50)

@cli.command()
@click.option('--hosts', required=True, help='远程服务器IP列表(逗号分隔)')
@click.option('--port', default=22, help='SSH端口,默认22')
@click.option('--user', default='root', help='用户名,默认root')
@click.option('--password', prompt=True, hide_input=True, help='SSH密码')
@click.option('--commands', required=True, help='要执行的命令列表(分号分隔)')
def batch_exec(hosts, port, user, password, commands):
    """批量执行多IP多命令"""
    host_list = [h.strip() for h in hosts.split(",") if h.strip()]
    cmd_list = [c.strip() for c in commands.split(";") if c.strip()]

    if not host_list or not cmd_list:
        click.secho("❌ 输入参数无效:IP或命令列表为空", fg="red")
        return

    click.secho(f"📡 开始批量任务 | 主机数:{len(host_list)} | 命令数:{len(cmd_list)}", fg="magenta", bold=True)

    # 按顺序执行每个主机的所有命令
    for host in host_list:
        execute_commands(host, port, user, password, cmd_list)

if __name__ == '__main__':
    cli()

"""
命令执行方法:
# 监控三台主机的磁盘和进程
python batch_ssh.py batch-exec \
    --hosts "192.168.1.100,10.0.0.5,172.16.8.20" \
    --user admin \
    --password "your_password" \
    --commands "df -h;free -m;ps aux"
这两年,IT行业面临经济周期波动与AI产业结构调整的双重压力,确实有很多运维与网络工程师因企业缩编或技术迭代而暂时失业。
很多人都在提运维网工失业后就只能去跑滴滴送外卖了,但我想分享的是,对于运维人员来说,即便失业以后仍然有很多副业可以尝试。
运维副业方向
运维,千万不要再错过这些副业机会!
第一个是知识付费类副业:输出经验打造个人IP
在线教育平台讲师
操作路径:在慕课网、极客时间等平台开设《CCNA实战》《Linux运维从入门到精通》等课程,或与培训机构合作录制专题课。
收益模式:课程销售分成、企业内训。
技术博客与公众号运营
操作路径:撰写网络协议解析、故障排查案例、设备评测等深度文章,通过公众号广告、付费专栏及企业合作变现。
收益关键:每周更新2-3篇原创,结合SEO优化与社群运营。
第二个是技术类副业:深耕专业领域变现
企业网络设备配置与优化服务
操作路径:为中小型企业提供路由器、交换机、防火墙等设备的配置调试、性能优化及故障排查服务。可通过本地IT服务公司合作或自建线上接单平台获客。
收益模式:按项目收费或签订年度维护合同。
远程IT基础设施代维
操作路径:通过承接服务器监控、日志分析、备份恢复等远程代维任务。适合熟悉Zabbix、ELK等技术栈的工程师。
收益模式:按工时计费或包月服务。
网络安全顾问与渗透测试
操作路径:利用OWASP Top 10漏洞分析、Nmap/BurpSuite等工具,为企业提供漏洞扫描、渗透测试及安全加固方案。需考取CISP等认证提升资质。
收益模式:单次渗透测试报告收费;长期安全顾问年费。
比如不久前跟我一起聊天的一个粉丝,他自己之前是大四实习的时候做的运维,发现运维7*24小时待命受不了,就准备转网安,学了差不多2个月,然后开始挖漏洞,光是补天的漏洞奖励也有个四五千,他说自己每个月的房租和饭钱就够了。

为什么我会推荐你网安是运维人员的绝佳副业&转型方向?
1.你的经验是巨大优势: 你比任何人都懂系统、网络和架构。漏洞挖掘、内网渗透、应急响应,这些核心安全能力本质上是“攻击视角下的运维”。你的运维背景不是从零开始,而是降维打击。
2.越老越吃香,规避年龄危机: 安全行业极度依赖经验。你的排查思路、风险意识和对复杂系统的理解能力,会随着项目积累而愈发珍贵,真正做到“姜还是老的辣”。
3.职业选择极其灵活: 你可以加入企业成为安全专家,可以兼职“挖洞“获取丰厚奖金,甚至可以成为自由顾问。这种多样性为你提供了前所未有的抗风险能力。
4.市场需求爆发,前景广阔: 在国家级政策的推动下,从一线城市到二三线地区,安全人才缺口正在急剧扩大。现在布局,正是抢占未来先机的黄金时刻。

运维转行学习路线

(一)第一阶段:网络安全筑基
1. 阶段目标
你已经有运维经验了,所以操作系统、网络协议这些你不是零基础。但要学安全,得重新过一遍——只不过这次我们是带着“安全视角”去学。
2. 学习内容
**操作系统强化:**你需要重点学习 Windows、Linux 操作系统安全配置,对比运维工作中常规配置与安全配置的差异,深化系统安全认知(比如说日志审计配置,为应急响应日志分析打基础)。
**网络协议深化:**结合过往网络协议应用经验,聚焦 TCP/IP 协议簇中的安全漏洞及防护机制,如 ARP 欺骗、TCP 三次握手漏洞等(为 SRC 漏扫中协议层漏洞识别铺垫)。
**Web 与数据库基础:**补充 Web 架构、HTTP 协议及 MySQL、SQL Server 等数据库安全相关知识,了解 Web 应用与数据库在网安中的作用。
**编程语言入门:**学习 Python 基础语法,掌握简单脚本编写,为后续 SRC 漏扫自动化脚本开发及应急响应工具使用打基础。
**工具实战:**集中训练抓包工具(Wireshark)、渗透测试工具(Nmap)、漏洞扫描工具(Nessus 基础版)的使用,结合模拟场景练习工具应用(掌握基础扫描逻辑,为 SRC 漏扫工具进阶做准备)。
(二)第二阶段:漏洞挖掘与 SRC 漏扫实战
1. 阶段目标
这阶段是真正开始“动手”了。信息收集、漏洞分析、工具联动,一样不能少。
熟练运用漏洞挖掘及 SRC 漏扫工具,具备独立挖掘常见漏洞及 SRC 平台漏扫实战能力,尝试通过 SRC 挖洞搞钱,不管是低危漏洞还是高危漏洞,先挖到一个。
2. 学习内容
信息收集实战:结合运维中对网络拓扑、设备信息的了解,强化基本信息收集、网络空间搜索引擎(Shodan、ZoomEye)、域名及端口信息收集技巧,针对企业级网络场景开展信息收集练习(为 SRC 漏扫目标筛选提供支撑)。
漏洞原理与分析:深入学习 SQL 注入、CSRF、文件上传等常见漏洞的原理、危害及利用方法,结合运维工作中遇到的类似问题进行关联分析(明确 SRC 漏扫重点漏洞类型)。
工具进阶与 SRC 漏扫应用:
-
系统学习 SQLMap、BurpSuite、AWVS 等工具的高级功能,开展工具联用实战训练;
-
专项学习 SRC 漏扫流程:包括 SRC 平台规则解读(如漏洞提交规范、奖励机制)、漏扫目标范围界定、漏扫策略制定(全量扫描 vs 定向扫描)、漏扫结果验证与复现;
-
实战训练:使用 AWVS+BurpSuite 组合开展 SRC 平台目标漏扫,练习 “扫描 - 验证 - 漏洞报告撰写 - 平台提交” 全流程。
SRC 实战演练:选择合适的 SRC 平台(如补天、CNVD)进行漏洞挖掘与漏扫实战,积累实战经验,尝试获取挖洞收益。
恭喜你,如果学到这里,你基本可以下班搞搞副业创收了,并且具备渗透测试工程师必备的「渗透技巧」、「溯源能力」,让你在黑客盛行的年代别背锅,工作实现升职加薪的同时也能开创副业创收!
如果你想要入坑黑客&网络安全,笔者给大家准备了一份:全网最全的网络安全资料包需要保存下方图片,微信扫码即可前往获取!
因篇幅有限,仅展示部分资料,需要点击下方链接即可前往获取
CSDN大礼包:《黑客&网络安全入门&进阶学习资源包》免费分享
(三)第三阶段:渗透测试技能学习
1. 阶段目标
全面掌握渗透测试理论与实战技能,能够独立完成渗透测试项目,编写规范的渗透测试报告,具备渗透测试工程师岗位能力,为护网红蓝对抗及应急响应提供技术支撑。
2. 学习内容
渗透测试核心理论:系统学习渗透测试流程、方法论及法律法规知识,明确渗透测试边界与规范(与红蓝对抗攻击边界要求一致)。
实战技能训练:开展漏洞扫描、漏洞利用、电商系统渗透测试、内网渗透、权限提升(Windows、Linux)、代码审计等实战训练,结合运维中熟悉的系统环境设计测试场景(强化红蓝对抗攻击端技术能力)。
工具开发实践:基于 Python 编程基础,学习渗透测试工具开发技巧,开发简单的自动化测试脚本(可拓展用于 SRC 漏扫自动化及应急响应辅助工具)。
报告编写指导:学习渗透测试报告的结构与编写规范,完成多个不同场景的渗透测试报告撰写练习(与 SRC 漏洞报告、应急响应报告撰写逻辑互通)。
(四)第四阶段:企业级安全攻防(含红蓝对抗)、应急响应
1. 阶段目标
掌握企业级安全攻防、护网红蓝对抗及应急响应核心技能,考取网安行业相关证书。
2. 学习内容
护网红蓝对抗专项:
-
红蓝对抗基础:学习护网行动背景、红蓝对抗规则(攻击范围、禁止行为)、红蓝双方角色职责(红队:模拟攻击;蓝队:防御检测与应急处置);
-
红队实战技能:强化内网渗透、横向移动、权限维持、免杀攻击等高级技巧,模拟护网中常见攻击场景;
-
蓝队实战技能:学习安全设备(防火墙、IDS/IPS、WAF)联动防御配置、安全监控平台(SOC)使用、攻击行为研判与溯源方法;
-
模拟护网演练:参与团队式红蓝对抗演练,完整体验 “攻击 - 检测 - 防御 - 处置” 全流程。
应急响应专项: -
应急响应流程:学习应急响应 6 步流程(准备 - 检测 - 遏制 - 根除 - 恢复 - 总结),掌握各环节核心任务;
-
实战技能:开展操作系统入侵响应(如病毒木马清除、异常进程终止)、数据泄露应急处置、漏洞应急修补等实战训练;
-
工具应用:学习应急响应工具(如 Autoruns、Process Monitor、病毒分析工具)的使用,提升处置效率;
-
案例复盘:分析真实网络安全事件应急响应案例(如勒索病毒事件),总结处置经验。
其他企业级攻防技能:学习社工与钓鱼、CTF 夺旗赛解析等内容,结合运维中企业安全防护需求深化理解。
证书备考:针对网安行业相关证书考试内容(含红蓝对抗、应急响应考点)进行专项复习,参加模拟考试,查漏补缺。
运维转行网络攻防知识库分享
网络安全这行,不是会几个工具就能搞定的。你得有体系,懂原理,能实战。尤其是从运维转过来的,别浪费你原来的经验——你比纯新人强多了。
但也要沉得住气,别学了两天Web安全就觉得自己是黑客了。内网、域渗透、代码审计、应急响应,要学的还多着呢。
如果你真的想转,按这个路子一步步走,没问题。如果你只是好奇,我劝你再想想——这行要持续学习,挺累的,但也是真有意思。
关于如何学习网络安全,笔者也给大家整理好了全套网络安全知识库,需要的可以扫码获取!
因篇幅有限,仅展示部分资料,需要点击下方链接即可前往获取
CSDN大礼包:《黑客&网络安全入门&进阶学习资源包》免费分享
1、网络安全意识
2、Linux操作系统
3、WEB架构基础与HTTP协议
4、Web渗透测试
5、渗透测试案例分享
6、渗透测试实战技巧
7、攻防对战实战
8、CTF之MISC实战讲解
关于如何学习网络安全,笔者也给大家整理好了全套网络安全知识库,需要的可以扫码获取!
因篇幅有限,仅展示部分资料,需要点击下方链接即可前往获取

葡萄城是专业的软件开发技术和低代码平台提供商,聚焦软件开发技术,以“赋能开发者”为使命,致力于通过表格控件、低代码和BI等各类软件开发工具和服务
更多推荐


 11
11 0
0- 0


 已为社区贡献2条内容

所有评论(0)