首屏加载链路拆解——从 TTFB 到 LCP 的关键路径优化
文章目录

每日一句正能量
努力尽今夕,少年犹可夸。
不必空想遥远的未来,只需对当下此刻负责。只要今天尽力了,就值得嘉许。它把漫长的成长之路,变成一块块可被征服的砖石,让“努力”变得具体而可执行。
摘要
当你打开 OpenAI Codex 的官网时,从按下回车键到 Hero 区域完全呈现,整个过程可能不到一秒。但这「不到一秒」的背后,是一条由 DNS 查询、TCP 握手、TLS 协商、资源编排、关键渲染路径交织而成的精密链路。本文将以 Codex 官网为分析对象,逐层拆解其首屏加载的技术细节,并给出可直接落地的 Next.js 工程化方案。
一、为什么首屏加载值得被「拆解」
在用户体验的语境下,首屏加载不是「快一点」或「慢一点」的问题,而是用户是否愿意继续停留的门槛。Google 的研究表明,当页面加载时间从 1 秒增加到 3 秒时,跳出率会上升 32%。对于 Codex 这类以技术公信力为核心的产品页,首屏的丝滑呈现本身就是产品能力的一部分。
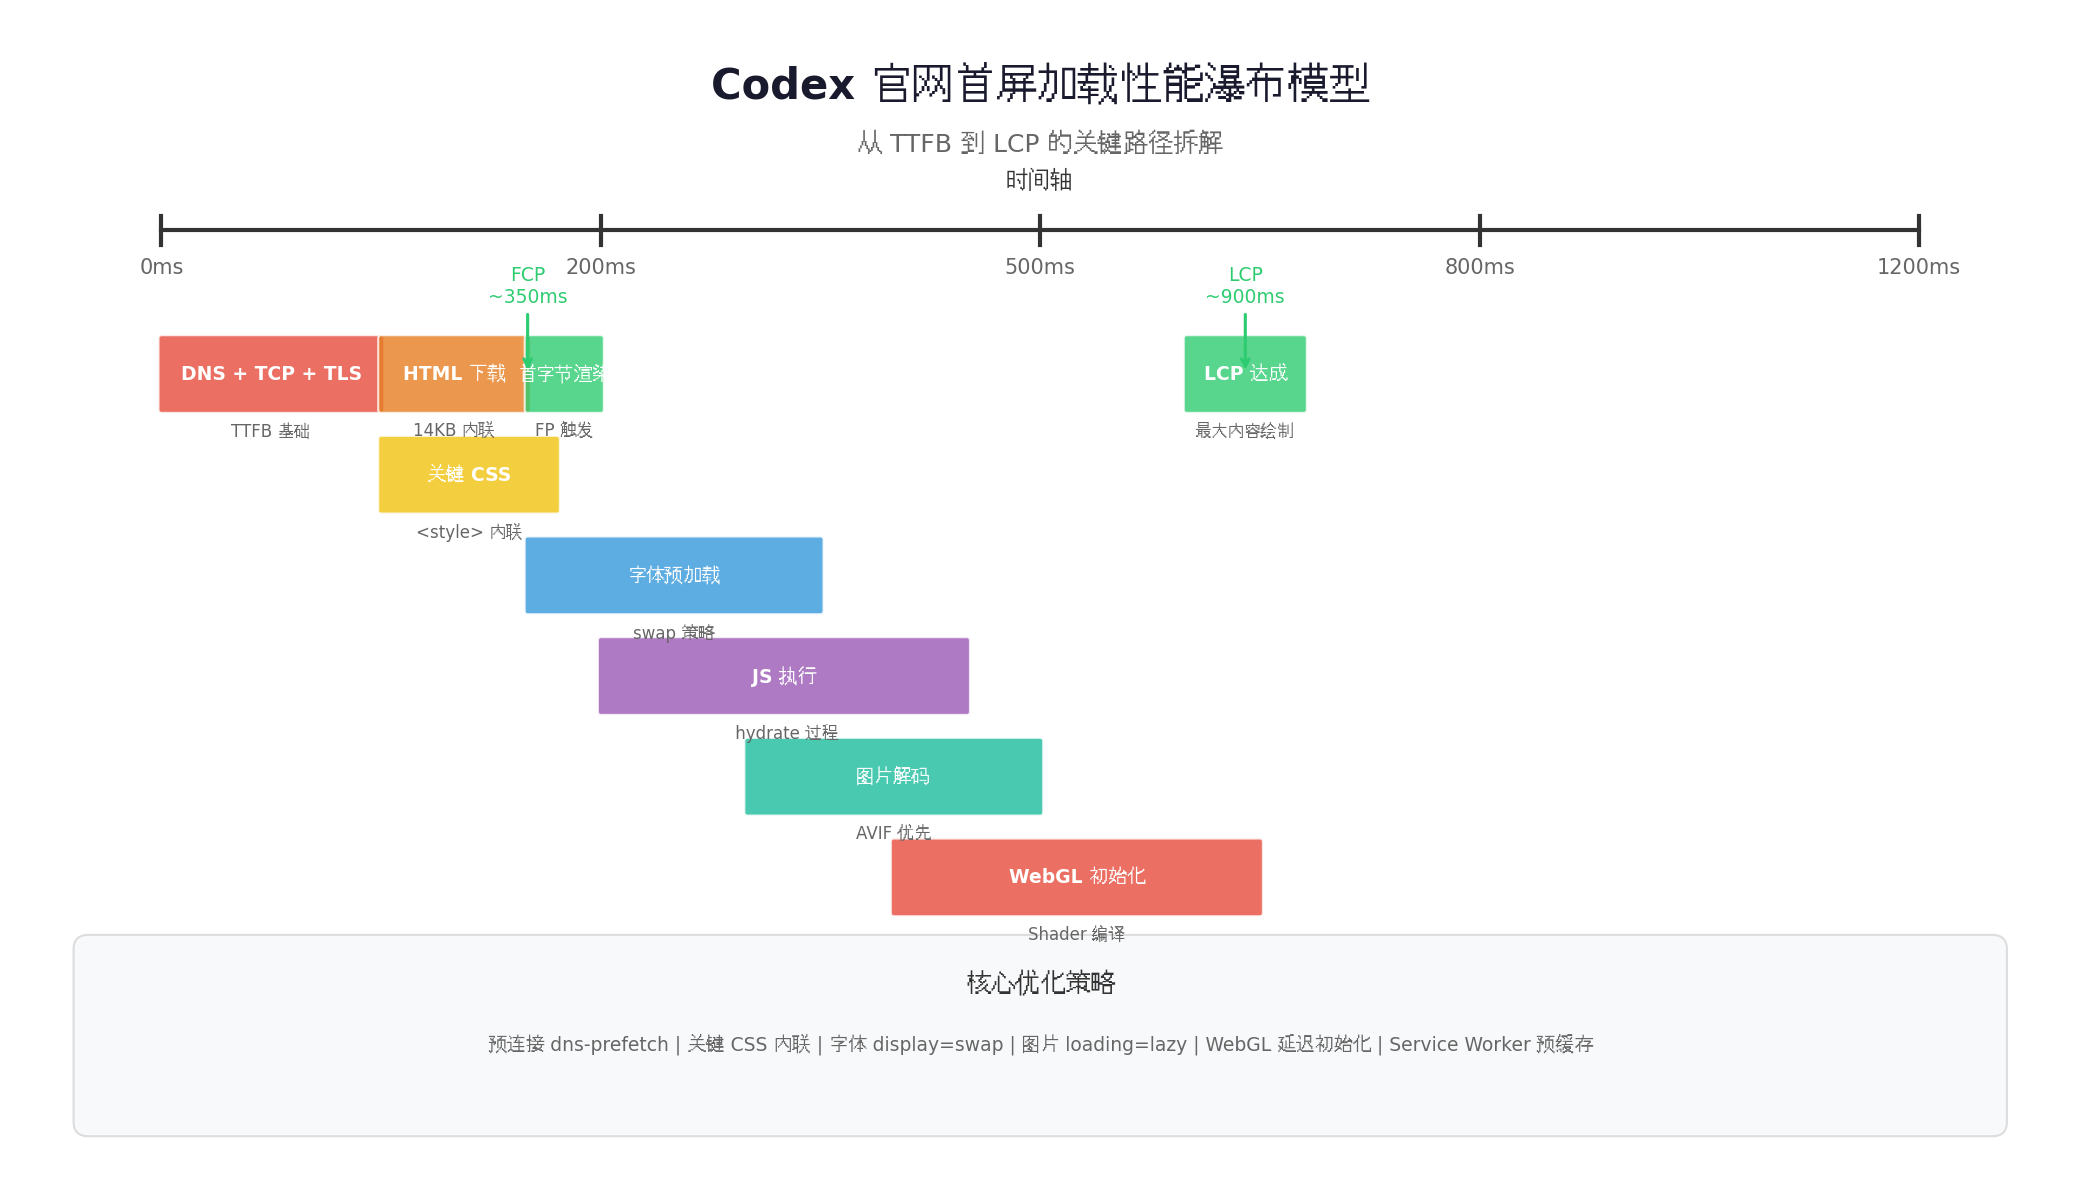
首屏加载的核心指标由 TTFB(Time to First Byte)、FCP(First Contentful Paint) 与 LCP(Largest Contentful Paint) 三个节点构成。它们分别回答了三个问题:服务器多快响应?用户多久看到内容?用户多久看到最重要的内容?
下面这张瀑布模型图,展示了一条理想化的首屏加载链路:
二、网络层:DNS、TCP、TLS 的握手耗时
在浏览器真正开始下载 HTML 之前,它需要完成三次底层握手。以 Codex 官网部署在 Vercel Edge Network 的场景为例,我们可以通过 Chrome DevTools 的 Network 面板观察到以下时序:
| 阶段 | 理想耗时 | 优化手段 |
|---|---|---|
| DNS Lookup | 20–80ms | dns-prefetch 预解析 |
| TCP Handshake | 30–100ms | preconnect 预连接 |
| TLS Negotiation | 50–150ms | TLS 1.3、0-RTT |
| TTFB | < 200ms | Edge SSR、CDN 缓存 |
2.1 DNS 预解析与预连接
Codex 官网的 <head> 中很可能包含类似以下的资源提示:
<link rel="dns-prefetch" href="//cdn.openai.com" />
<link rel="preconnect" href="https://fonts.googleapis.com" crossorigin />
dns-prefetch 仅解析域名到 IP,而 preconnect 更进一步,提前完成 TCP 和 TLS 握手。两者的区别在于:如果你确定会从该域名加载关键资源,使用 preconnect;如果只是可能用到,使用 dns-prefetch 避免浪费连接池。
在 Next.js 中,可以通过 _document.tsx 统一注入这些标签:
// pages/_document.tsx
import Document, { Html, Head, Main, NextScript } from 'next/document';

export default class MyDocument extends Document {
  render() {
    return (
      <Html lang="zh-CN">
        <Head>
          {/* 预连接关键域名 */}
          <link rel="preconnect" href="https://fonts.googleapis.com" crossorigin="anonymous" />
          <link rel="preconnect" href="https://fonts.gstatic.com" crossorigin="anonymous" />

          {/* DNS 预解析辅助域名 */}
          <link rel="dns-prefetch" href="//cdn.openai.com" />
          <link rel="dns-prefetch" href="//analytics.openai.com" />

          {/* 预加载首屏关键字体 */}
          <link
            rel="preload"
            href="/fonts/soehne-buch.woff2"
            as="font"
            type="font/woff2"
            crossorigin="anonymous"
          />
        </Head>
        <body>
          <Main />
          <NextScript />
        </body>
      </Html>
    );
  }
}
2.2 TLS 1.3 与 0-RTT
Vercel Edge 默认启用 TLS 1.3,其 0-RTT(Zero Round Trip Time)特性允许客户端在第一个数据包中就发送 HTTP 请求,将 TLS 握手压缩到一次往返。对于自托管的服务器,确保 OpenSSL/Nginx 配置中启用了 TLS 1.3:
ssl_protocols TLSv1.3;
ssl_prefer_server_ciphers off;
三、资源编排:<head> 内的优先级策略
HTML 文档的 <head> 是一个「先到先得」的解析队列。浏览器遇到 <script> 会阻塞解析,遇到 <link rel="stylesheet"> 也会阻塞渲染。因此,资源的加载顺序直接决定了 FCP 和 LCP 的时机。
3.1 关键 CSS 内联(Critical CSS Inline)
Codex 官网的 Hero 区域使用了暗色背景、大字号标题和精致的间距系统。如果这些样式的定义存在于一个外部 CSS 文件中,浏览器必须等待它下载完成后才能开始渲染。优化的策略是:将首屏渲染所必需的最小 CSS 直接内联到 <head> 的 <style> 标签中。
在 Next.js 中,可以借助 critters 或自定义 Webpack 插件实现关键 CSS 提取。以下是手动内联的简化示例:
// components/CriticalCSS.tsx
export const CriticalCSS = () => (
  <style dangerouslySetInnerHTML={{ __html: `
    /* 仅包含首屏 Hero 区域的关键样式 */
    :root {
      --bg-primary: #0a0a0f;
      --text-primary: #f0f0f5;
      --accent: #10a37f;
    }

    html {
      color-scheme: dark;
    }

    body {
      margin: 0;
      background-color: var(--bg-primary);
      color: var(--text-primary);
      font-family: 'Söhne', system-ui, -apple-system, sans-serif;
      -webkit-font-smoothing: antialiased;
    }

    .hero {
      min-height: 100vh;
      display: flex;
      flex-direction: column;
      justify-content: center;
      align-items: center;
      padding: 0 24px;
    }

    .hero h1 {
      font-size: clamp(2.5rem, 5vw, 4.5rem);
      font-weight: 500;
      line-height: 1.1;
      letter-spacing: -0.02em;
      margin: 0 0 24px;
      text-wrap: balance;
    }

    .hero p {
      font-size: clamp(1rem, 2vw, 1.25rem);
      color: var(--text-secondary, #a0a0b0);
      max-width: 560px;
      text-align: center;
      margin: 0 0 32px;
      line-height: 1.6;
    }

    .cta-button {
      display: inline-flex;
      align-items: center;
      gap: 8px;
      padding: 12px 24px;
      background-color: var(--accent);
      color: #fff;
      border-radius: 8px;
      font-weight: 500;
      text-decoration: none;
      transition: transform 0.15s ease, opacity 0.15s ease;
    }
  `}} />
);
然后在 _app.tsx 中引入:
// pages/_app.tsx
import type { AppProps } from 'next/app';
import { CriticalCSS } from '@/components/CriticalCSS';

export default function MyApp({ Component, pageProps }: AppProps) {
  return (
    <>
      <CriticalCSS />
      <Component {...pageProps} />
    </>
  );
}
非关键样式(如 Footer、Modal、动画库)则通过异步加载:
<link rel="preload" href="/css/non-critical.css" as="style" onload="this.onload=null;this.rel='stylesheet'" />
<noscript><link rel="stylesheet" href="/css/non-critical.css" /></noscript>
3.2 preload 的精准使用
preload 不是用得越多越好。每多一个 preload,就多一个与首字节竞争带宽的请求。Codex 官网的 preload 策略应该只聚焦在两类资源上:
- LCP 图片:Hero 区域的最大内容元素(通常是一张产品截图或背景图)。
- 首屏字体:标题字体的 Regular 和 Medium 字重。
<link rel="preload" href="/images/hero-codex.avif" as="image" type="image/avif" fetchpriority="high" />
注意 fetchpriority="high" 的引入——这是 Chrome 102+ 支持的属性,它告诉浏览器这个请求的优先级应该高于其他图片,从而加速 LCP。
四、字体加载:消除 CLS 的「隐形杀手」
字体加载是首屏优化中最容易被忽视、却最容易导致 CLS(Cumulative Layout Shift)的环节。当自定义字体尚未下载完成时,浏览器会先用系统字体渲染文本;字体下载完成后,文本宽度变化导致布局抖动。
4.1 font-display: swap 与 size-adjust
Codex 官网使用的 Söhne 字体族,在 @font-face 声明中应当包含以下配置:
@font-face {
  font-family: 'Söhne';
  src: url('/fonts/soehne-buch.woff2') format('woff2');
  font-weight: 400;
  font-style: normal;
  font-display: swap;
  /* 关键:使用 size-adjust 匹配系统字体 metrics */
  size-adjust: 105%;
  ascent-override: 90%;
  descent-override: 20%;
}
font-display: swap 确保文本在字体加载期间立即可见(使用系统字体回退),而 size-adjust 和 ascent-override 则调整自定义字体的尺寸,使其与系统回退字体(如 system-ui)的排版尺寸尽可能接近。这样,当字体切换发生时,元素的占位高度几乎不变,CLS 趋近于零。
4.2 字体子集化
如果 Codex 官网仅面向中文用户展示少量英文标题,可以使用 glyphhanger 对字体进行子集化,只保留用到的字符:
npx glyphhanger --subset=/fonts/soehne-buch.woff2 \
  --formats=woff2 \
  --onlyVisible \
  --string="Codex由AI驱动的编程助手"
子集化后的字体文件可以从 200KB 压缩到 20KB 以下,显著减少阻塞时间。
五、图片优化:LCP 元素的「黄金法则」
在 Codex 官网的 Hero 区域,LCP 元素很可能是一张展示 Codex 界面的产品截图。这张图片的加载速度直接决定了 LCP 指标。
5.1 格式选择与响应式
现代前端应当优先使用 AVIF(体积最小)→ WebP(兼容性更好)→ JPEG(终极兜底)的格式链路。Next.js 的 <Image> 组件可以自动处理这一逻辑:
import Image from 'next/image';

export function HeroImage() {
  return (
    <Image
      src="/images/codex-interface.avif"
      alt="Codex 编程助手界面预览"
      width={1200}
      height={750}
      priority        // 等价于 preload + fetchpriority="high"
      quality={75}
      sizes="(max-width: 768px) 100vw, 80vw"
      placeholder="blur"
      blurDataURL="data:image/avif;base64,AAAAIGZ0eXBhdmlmAAAAAGF2aWZtaWYxbWlhZk1BMUIAAAD5..."
    />
  );
}
priority 属性是 Next.js 的「一键优化」:它会自动在 <head> 中插入 preload,并设置 fetchpriority="high"。placeholder="blur" 则提供了一个低分辨率的占位图,消除图片加载时的视觉闪烁。
5.2 解码策略
对于非首屏图片,应当使用 decoding="async" 让浏览器在 GPU 上异步解码,避免阻塞主线程:
<Image
  src="/images/feature-detail.webp"
  alt="功能详情"
  width={800}
  height={500}
  loading="lazy"
  decoding="async"
/>
六、完整配置模板:Next.js 首屏优化工程化方案
将以上所有优化点整合,以下是一份可直接用于生产环境的 Next.js 配置模板:
// pages/_document.tsx
import Document, { Html, Head, Main, NextScript, DocumentContext } from 'next/document';

export default class MyDocument extends Document {
  static async getInitialProps(ctx: DocumentContext) {
    const initialProps = await Document.getInitialProps(ctx);
    return initialProps;
  }

  render() {
    return (
      <Html lang="zh-CN">
        <Head>
          {/* 1. 预连接关键域名 */}
          <link rel="preconnect" href="https://fonts.googleapis.com" crossorigin="anonymous" />
          <link rel="preconnect" href="https://fonts.gstatic.com" crossorigin="anonymous" />

          {/* 2. DNS 预解析 */}
          <link rel="dns-prefetch" href="//cdn.openai.com" />

          {/* 3. 预加载 LCP 图片 */}
          <link
            rel="preload"
            href="/images/hero-codex.avif"
            as="image"
            type="image/avif"
            fetchpriority="high"
          />

          {/* 4. 预加载关键字体 */}
          <link
            rel="preload"
            href="/fonts/soehne-buch.woff2"
            as="font"
            type="font/woff2"
            crossorigin="anonymous"
          />

          {/* 5. 关键 CSS 内联 */}
          <style dangerouslySetInnerHTML={{ __html: `
            :root { --bg-primary: #0a0a0f; --text-primary: #f0f0f5; --accent: #10a37f; }
            html { color-scheme: dark; }
            body { margin: 0; background: var(--bg-primary); color: var(--text-primary);
                   font-family: 'Söhne', system-ui, sans-serif; -webkit-font-smoothing: antialiased; }
            .hero { min-height: 100vh; display: flex; flex-direction: column;
                    justify-content: center; align-items: center; padding: 0 24px; }
            .hero h1 { font-size: clamp(2.5rem, 5vw, 4.5rem); font-weight: 500;
                       line-height: 1.1; letter-spacing: -0.02em; margin: 0 0 24px; text-wrap: balance; }
          `}} />

          {/* 6. 异步加载非关键 CSS */}
          <link
            rel="preload"
            href="/css/non-critical.css"
            as="style"
            // @ts-ignore
            onload="this.onload=null;this.rel='stylesheet'"
          />
          <noscript>
            <link rel="stylesheet" href="/css/non-critical.css" />
          </noscript>
        </Head>
        <body>
          <Main />
          <NextScript />
        </body>
      </Html>
    );
  }
}
// next.config.js
/** @type {import('next').NextConfig} */
const nextConfig = {
  // 启用图片优化
  images: {
    formats: ['image/avif', 'image/webp'],
    deviceSizes: [640, 750, 828, 1080, 1200, 1920, 2048, 3840],
    imageSizes: [16, 32, 48, 64, 96, 128, 256, 384],
  },

  // HTTP 响应头优化
  async headers() {
    return [
      {
        source: '/:path*',
        headers: [
          {
            key: 'Strict-Transport-Security',
            value: 'max-age=63072000; includeSubDomains; preload',
          },
          {
            key: 'X-DNS-Prefetch-Control',
            value: 'on',
          },
        ],
      },
      {
        // 静态资源长期缓存
        source: '/fonts/:path*',
        headers: [
          {
            key: 'Cache-Control',
            value: 'public, max-age=31536000, immutable',
          },
        ],
      },
    ];
  },

  // 编译优化
  swcMinify: true,
  reactStrictMode: true,
};

module.exports = nextConfig;
七、性能预算与持续监控
优化不是一次性的工作。建议为 Codex 级别的官网设定以下 性能预算:
| 指标 | 预算值 | 测量工具 |
|---|---|---|
| TTFB | < 200ms | WebPageTest |
| FCP | < 1.0s | Lighthouse |
| LCP | < 1.5s | Lighthouse |
| CLS | < 0.05 | Chrome DevTools |
| INP | < 200ms | CrUX / web-vitals |
在 CI 流程中集成 Lighthouse CI,每次代码提交自动跑分,当 LCP 超过预算时阻断合并:
# .github/workflows/lighthouse.yml
- name: Run Lighthouse CI
  run: |
    npm install -g @lhci/cli@0.12.x
    lhci autorun
结语
首屏加载的优化,本质上是在有限的网络带宽和浏览器解析能力下,对资源优先级进行精准编排的艺术。从 DNS 预解析到 TLS 1.3,从关键 CSS 内联到 fetchpriority="high",每一个 50ms 的提升,都来自于对关键渲染路径的深刻理解。
Codex 官网的「快」,不是某一个黑科技的结果,而是数十个微优化在工程化体系下的系统叠加。希望本文的拆解与代码模板,能为你的下一个项目提供可直接复用的首屏加速方案。
转载自:https://blog.csdn.net/sghtgjfhv/article/details/163981562
欢迎 👍点赞✍评论⭐收藏,欢迎指正

葡萄城是专业的软件开发技术和低代码平台提供商,聚焦软件开发技术,以“赋能开发者”为使命,致力于通过表格控件、低代码和BI等各类软件开发工具和服务,一站式满足开发者需求,帮助企业提升开发效率并创新开发模式。
更多推荐

 2
2 0
0- 0


 已为社区贡献2条内容

所有评论(0)