Linux 系统中 MinIO 部署与使用
另外 MinIO 服务器 API 与 MinIO 控制台是独立的,因此反向代理有两种配置方式,一种是使用相同的域名不同的 localtion 分别转发 MinIO 服务器 API 与 MinIO 控制台,另一种是使用独立专用域名进行转发,这里我使用的独立专用域名。我这里使用双节点部署,每个节点使用单硬盘进行数据存储。硬盘数量可以根据自身实际情况进行修改,因为我的硬盘做过 RAID1 ,所以我一般使
官方文档
部署说明
我这里使用双节点部署,每个节点使用单硬盘进行数据存储。硬盘数量可以根据自身实际情况进行修改,因为我的硬盘做过 RAID1 ,所以我一般使用单硬盘。节点数量也可以根据实际情况进行增加或减少。另外因为是多节点部署,所以最后我使用 Nginx 进行负载均衡。
部署条件
- 节点之间网络可以双向访问
- 各节点的服务监听端口需一致
- 各节点系统必须保持时间和日期同步
- 硬盘或分区的类型及大小应保持一致
二进制包部署
用以下命令在各个节点下载安装最新版本的稳定 MinIO 二进制包
wget https://dl.minio.org.cn/server/minio/release/linux-amd64/minio
chmod +x minio
mv minio /usr/local/bin/
对于二进制安装,需要手动创建 systemd 系统启动服务文件用于服务管理,其中的参数值根据实际情况进行修改即可
[Unit]
Description=MinIO
Documentation=https://minio.org.cn/docs/minio/linux/index.html
Wants=network-online.target
After=network-online.target
AssertFileIsExecutable=/usr/local/bin/minio

[Service]
WorkingDirectory=/usr/local

User=root
Group=root
ProtectProc=invisible

EnvironmentFile=-/etc/default/minio
ExecStartPre=/bin/bash -c "if [ -z \"${MINIO_VOLUMES}\" ]; then echo \"Variable MINIO_VOLUMES not set in /etc/default/minio\"; exit 1; fi"
ExecStart=/usr/local/bin/minio server $MINIO_OPTS $MINIO_VOLUMES

# MinIO RELEASE.2023-05-04T21-44-30Z adds support for Type=notify (https://www.freedesktop.org/software/systemd/man/systemd.service.html#Type=)
# This may improve systemctl setups where other services use `After=minio.server`
# Uncomment the line to enable the functionality
# Type=notify

# Let systemd restart this service always
Restart=always

# Specifies the maximum file descriptor number that can be opened by this process
LimitNOFILE=65536

# Specifies the maximum number of threads this process can create
TasksMax=infinity

# Disable timeout logic and wait until process is stopped
TimeoutStopSec=infinity
SendSIGKILL=no

[Install]
WantedBy=multi-user.target

# Built for ${project.name}-${project.version} (${project.name})
创建一个服务环境变量文件用于 MinIO 服务使用,文件位置为 systemd 服务文件中 EnvironmentFile 变量指定的路径
# Set the hosts and volumes MinIO uses at startup
# The command uses MinIO expansion notation {x...y} to denote a
# sequential series.
#
# The following example covers four MinIO hosts
# with 4 drives each at the specified hostname and drive locations.
# The command includes the port that each MinIO server listens on
# (default 9000)

MINIO_VOLUMES="http://192.168.132.101:9000/data http://192.168.132.106:9000/data"

# Set all MinIO server options
#
# The following explicitly sets the MinIO控制台 listen address to
# port 9001 on all network interfaces. The default behavior is dynamic
# port selection.

MINIO_OPTS="--console-address :9001"

# Set the root username. This user has unrestricted permissions to
# perform S3 and administrative API operations on any resource in the
# deployment.
#
# Defer to your organizations requirements for superadmin user name.

MINIO_ROOT_USER=minioadmin

# Set the root password
#
# Use a long, random, unique string that meets your organizations
# requirements for passwords.

MINIO_ROOT_PASSWORD=minio-secret-key-CHANGE-ME
上面示例的环境变量配置文件中配置了数据存储路径、控制台监听端口、管理员用户名密码。其中数据存储路径所在的硬盘或分区不可为系统盘或系统分区。
上述操作完成后即可重载系统启动服务文件并启动 MinIO 服务
systemctl daemon-reload && systemctl restart minio.service多节点部署时各节点操作相同,需要注意的是数据存储路径要与各节点相对应。部署完成后可以通过浏览器访问各节点的控制台进行登录验证功能是否正常。
反向代理配置
多节点部署时我一般通过 NGINX 配置反向代理实现负载均衡,并通过最少连接数进行连接请求分配转发。另外 MinIO 服务器 API 与 MinIO 控制台是独立的,因此反向代理有两种配置方式,一种是使用相同的域名不同的 localtion 分别转发 MinIO 服务器 API 与 MinIO 控制台,另一种是使用独立专用域名进行转发,这里我使用的独立专用域名
upstream minioapi {
        least_conn;
        server 192.168.132.101:9000;
        server 192.168.132.106:9000;
}

server {
    listen       80;
    server_name  minio.example.net;

    # Allow special characters in headers
    ignore_invalid_headers off;
    # Allow any size file to be uploaded.
    # Set to a value such as 1000m; to restrict file size to a specific value
    client_max_body_size 0;
    # Disable buffering
    proxy_buffering off;
    proxy_request_buffering off;

    location / {
        proxy_set_header Host $http_host;
        proxy_set_header X-Real-IP $remote_addr;
        proxy_set_header X-Forwarded-For $proxy_add_x_forwarded_for;
        proxy_set_header X-Forwarded-Proto $scheme;

        proxy_connect_timeout 300;
        # Default is HTTP/1, keepalive is only enabled in HTTP/1.1
        proxy_http_version 1.1;
        proxy_set_header Connection "";
        chunked_transfer_encoding off;

        proxy_hide_header 'Access-Control-Allow-Origin';
        proxy_hide_header 'Access-Control-Allow-Methods';
        proxy_hide_header 'Access-Control-Allow-Headers';
        proxy_hide_header 'Access-Control-Expose-Headers';

        # 允许所有域访问
        add_header 'Access-Control-Allow-Origin' '*' always;
        # 允许HTTP方法
        add_header 'Access-Control-Allow-Methods' 'GET, POST, PUT, OPTIONS' always;
        # 允许请求头
        add_header 'Access-Control-Allow-Headers' 'DNT,User-Agent,X-Requested-With,Content-Type,Authorization' always;
        # 允许客户端访问的响应头
        add_header 'Access-Control-Expose-Headers' 'Content-Length,Content-Range' always;

        # 处理OPTIONS预检请求
        if ($request_method = 'OPTIONS') {
            add_header 'Access-Control-Max-Age' 1728000;
            add_header 'Content-Type' 'text/plain; charset=utf-8';
            add_header 'Content-Length' 0;
            return 204;
        }
        # This uses the upstream directive definition to load balance
        proxy_pass http://minioapi;
    }
}
upstream minioconsole {
least_conn;
server 192.168.132.101:9001;
server 192.168.132.106:9001;
}
server {
listen 80;
server_name console.example.net;
# Allow special characters in headers
ignore_invalid_headers off;
# Allow any size file to be uploaded.
# Set to a value such as 1000m; to restrict file size to a specific value
client_max_body_size 0;
# Disable buffering
proxy_buffering off;
proxy_request_buffering off;
location / {
proxy_set_header Host $http_host;
proxy_set_header X-Real-IP $remote_addr;
proxy_set_header X-Forwarded-For $proxy_add_x_forwarded_for;
proxy_set_header X-Forwarded-Proto $scheme;
proxy_set_header X-NginX-Proxy true;
# This is necessary to pass the correct IP to be hashed
real_ip_header X-Real-IP;
proxy_connect_timeout 300;
# To support websocket
proxy_http_version 1.1;
proxy_set_header Upgrade $http_upgrade;
proxy_set_header Connection "upgrade";
chunked_transfer_encoding off;
# This uses the upstream directive definition to load balance
proxy_pass http://minioconsole/;
}
}配置完成反向代理后就可以通过对应的域名进行访问,因为是双节点同步,所以无论反向代理到哪个节点,操作的内容都是一致的。
用户访问策略
在实际应用环境中, MinIO 服务器实例一般会有多个 Bucket ,而每个 Bucket 为不同的服务或用户使用,这时就需要通过配置用户访问策略来限制专用用户访问专用 Bucket,而不是一个账号访问所有。
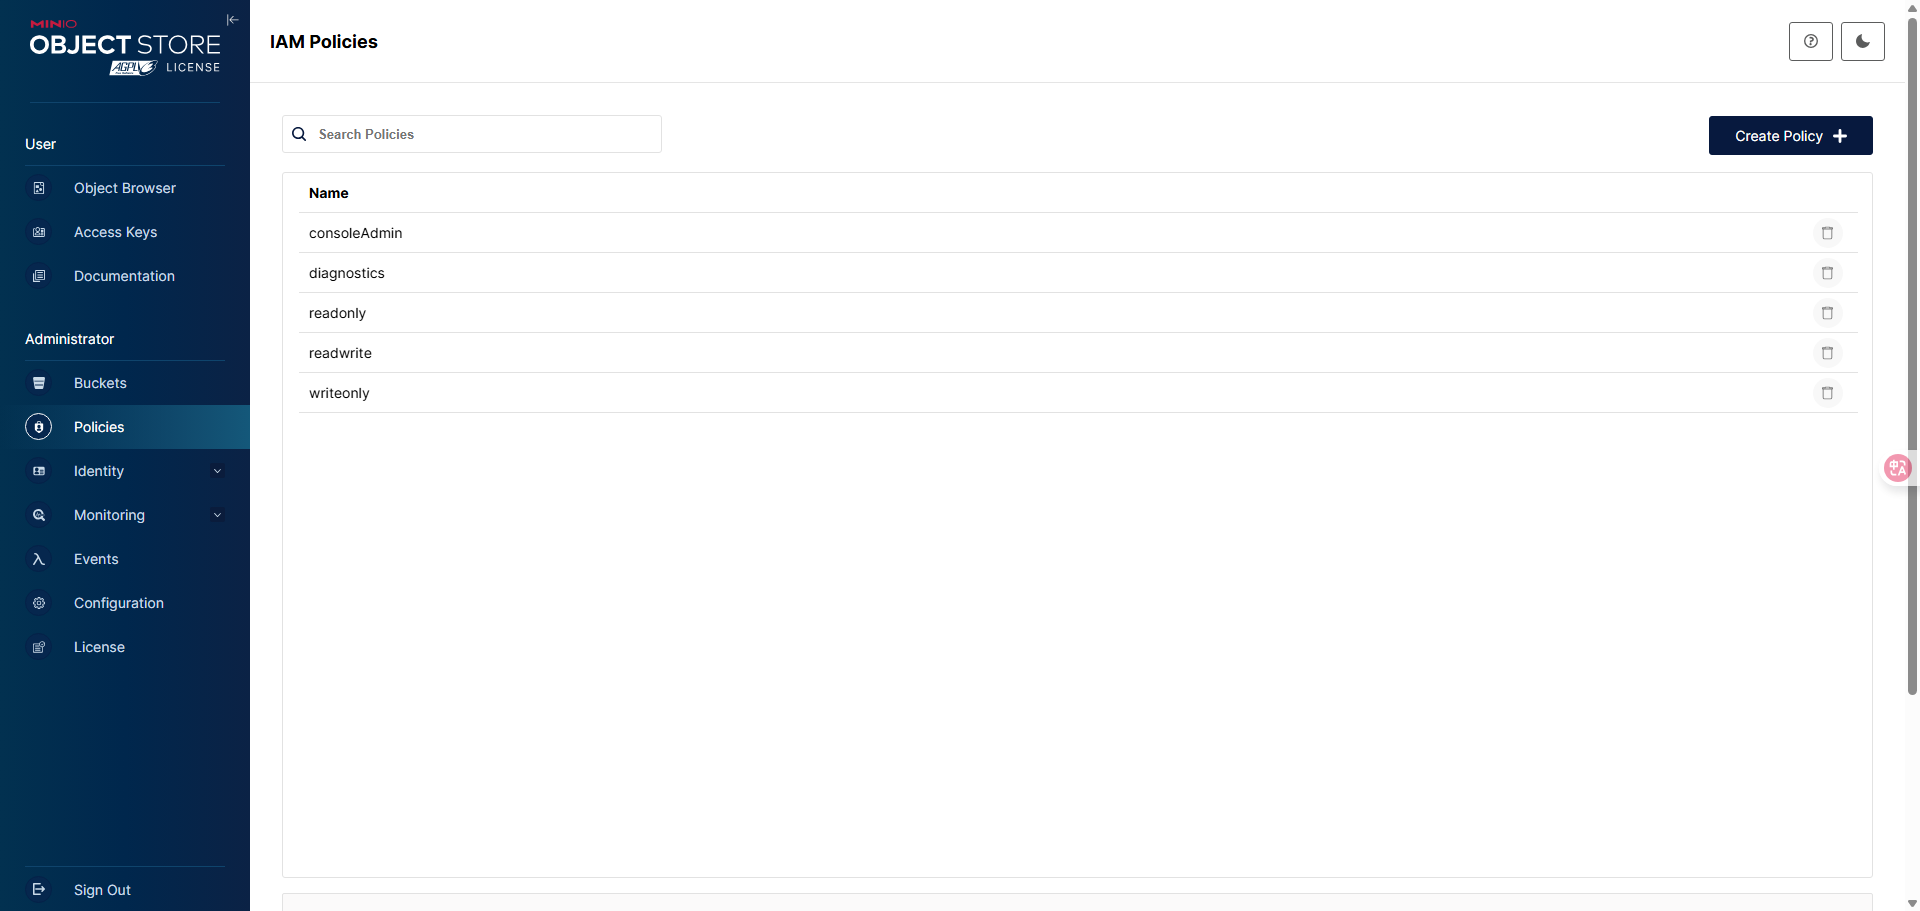
通过管理员账密登录控制台后选择 Policies 可以看到默认的几个访问策略,默认策略中针对的对象是所有 Bucket,因此我们需要新建 Policies 来实现专用用户访问专用 Bucket
例如这里我想创建一个访问策略为用户 gitlab 只能访问 gitlab-backups 这个 Bucket,则可以通过 Create Policy 创建 Policy,其中 Policy Name 我一般会和用户名相同,方便区分,也可以和 Bucket Name 相同,根据实际情况进行调整
其中 Policy 规则如下,该规则表示对名为 gitlab-backups 的 Bucket 及 Bucket 中的所有文件具有完全控制权限,具体权限控制规则可参考官方文档的访问管理部分
{
"Version": "2012-10-17",
"Statement": [
{
"Effect": "Allow",
"Action": [
"s3:*"
],
"Resource": [
"arn:aws:s3:::gitlab-backups",
"arn:aws:s3:::gitlab-backups/*"
]
}
]
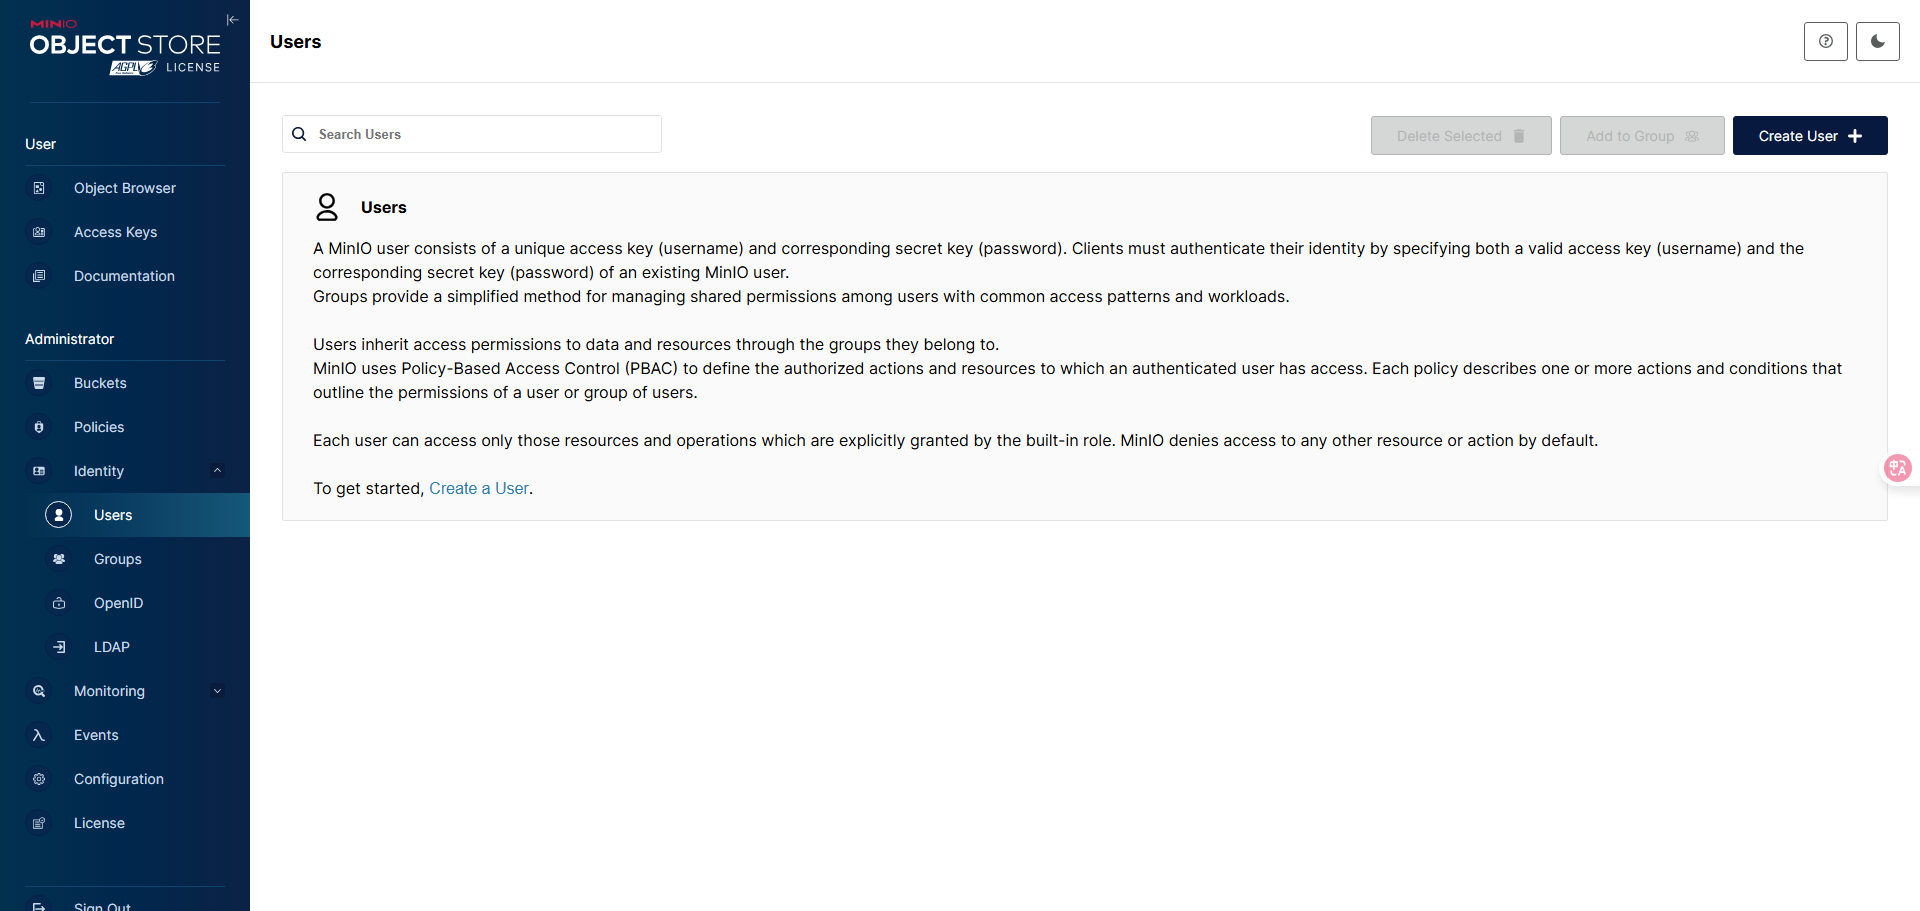
}创建完成 Policy 规则后就可以创建专用用户,在 Identity/Users 页面中通过 Create User 创建新用户
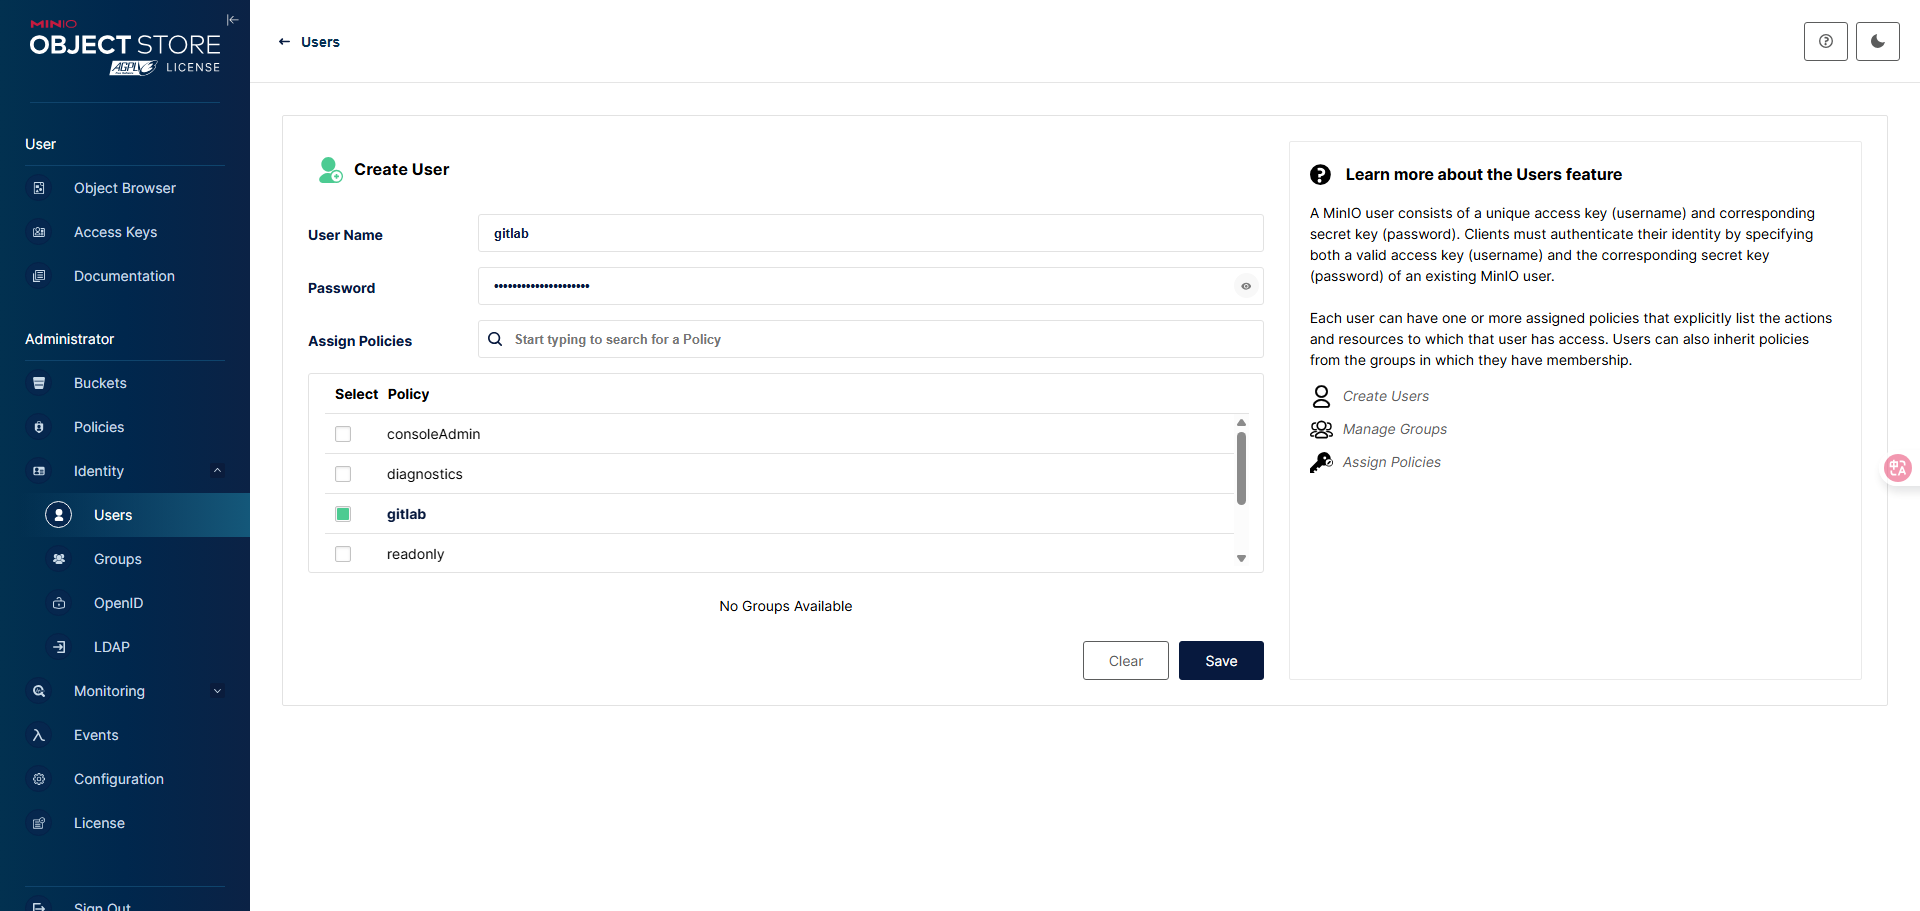
创建的新用户时需为其设置密码,并在 Assign Policy 配置项中选择之前创建的 Policy 规则,Policy 规则可以分配多个,根据实际情况调整
创建用户完成后在 Identity/Users 页面中点击用户名进入详情页面,在详情页面中可以设置用户是否禁用或删除、用户组归属、访问密钥管理、Policies 规则分配等操作
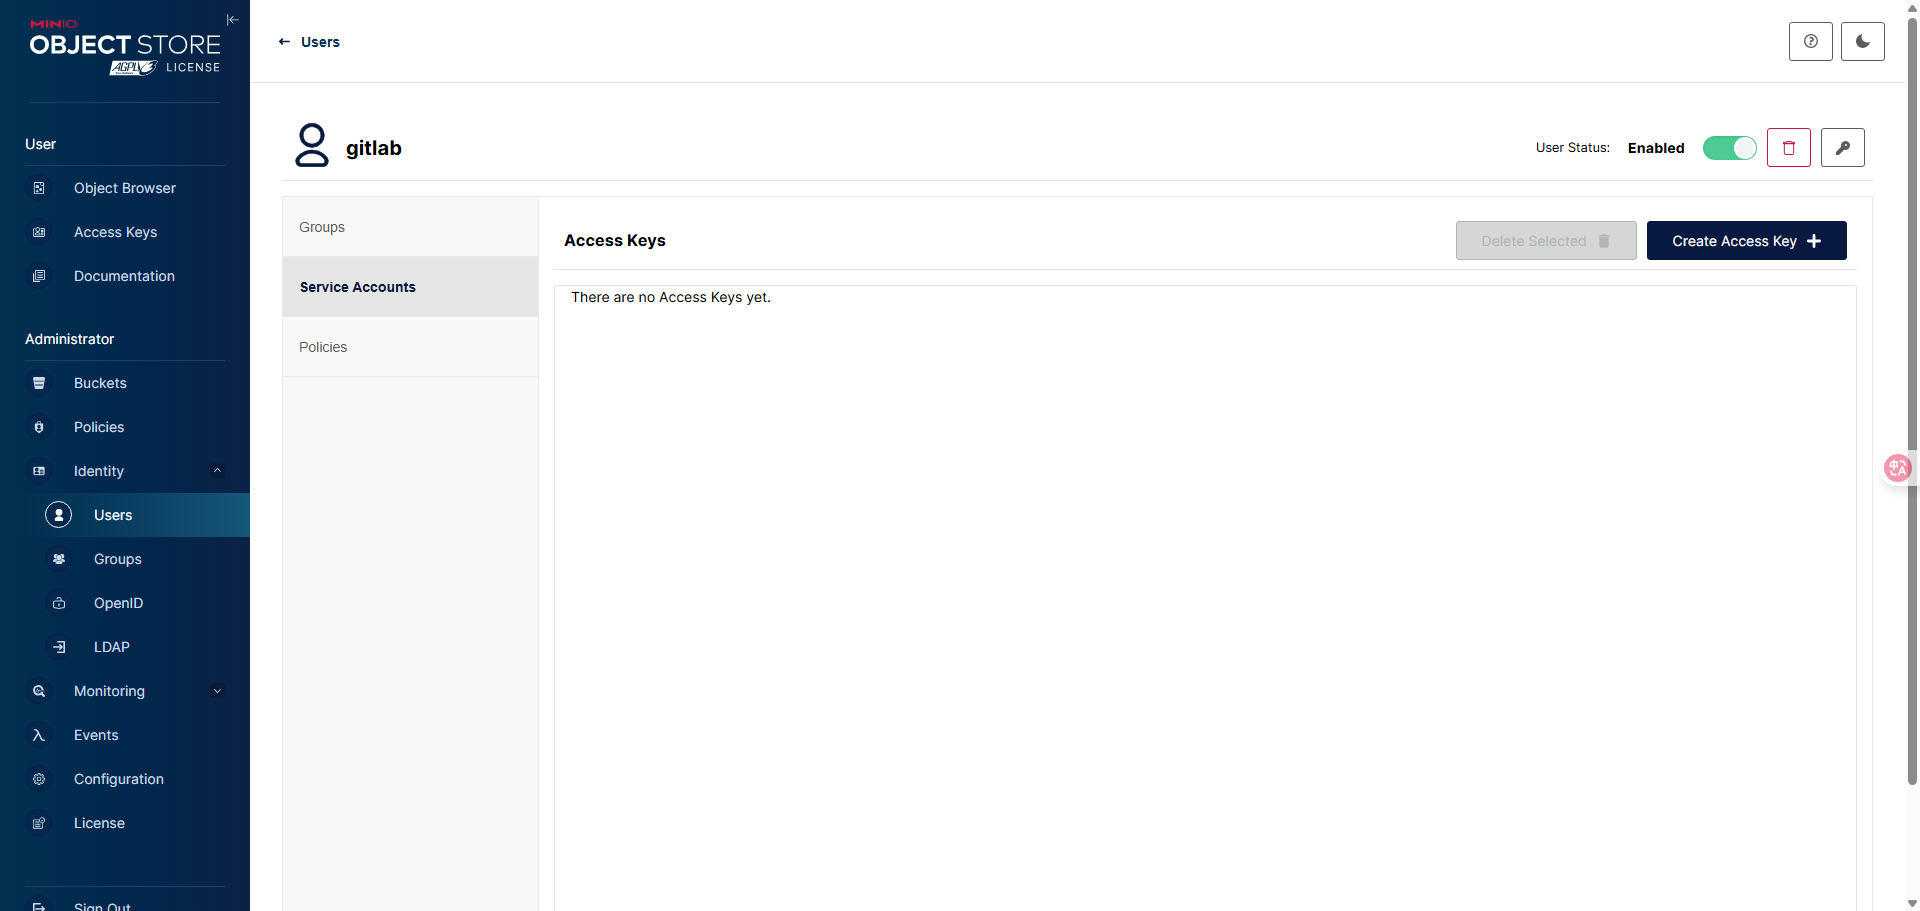
为了客户端访问的安全性规范性,我一般会通过创建访问密钥用于客户端连接调用。访问密钥在用户详情页面中的 Service Accounts 配置页面中通过 Create Access Key 进行创建,创建时默认会生成一对访问密钥,也可以自己修改,另外还可以配置访问密钥过期时间和名称等参数

创建完成后就可以使用访问密钥调用 API 等操作,该访问密钥同时也是针对专用用户,其访问策略也是专用用户对应的访问策略。

葡萄城是专业的软件开发技术和低代码平台提供商,聚焦软件开发技术,以“赋能开发者”为使命,致力于通过表格控件、低代码和BI等各类软件开发工具和服务
更多推荐


 14
14 0
0- 0


 已为社区贡献1条内容

所有评论(0)